How to Edit YouTube Videos: Software, Steps and AI Tools (2026)
A practical guide to editing YouTube videos: which editor to pick, the 8-step edit from rough cut to export, how to cut Shorts from long videos, and where AI saves time.
On this page
To edit a YouTube video, import your footage into an editor (DaVinci Resolve and iMovie are free), cut mistakes and dead air into a rough cut, tighten the pacing, fix audio and color, add text and captions, then export and upload through YouTube Studio. Every long video should also give you a few vertical Shorts.
That last step is where most channels leave views on the table. Tubular Labs data published in January 2026 found that 77% of global YouTube views in 2025 came from videos under a minute long, up from 70% in 2024 (see more YouTube Shorts statistics). Your finished long edit already holds your best moments, so cutting them into Shorts is the cheapest extra reach you will get from the same footage.
- Share of global YouTube views in 2025 from videos under a minute long
- 77%
- Tubular Labs (Tube Trends column on TVREV), January 2026
- Maximum length of a YouTube Short (square or vertical video)
- 3 min
- YouTube Official Blog, October 2024
- Daily YouTube Shorts views
- 200B+
- YouTube Official Blog, August 2026
- Longest upload for a verified YouTube account (or 256 GB, whichever is less)
- 12 hours
- YouTube upload limits
What software should you use to edit YouTube videos?
Pick the editor that fits your computer, your budget and the format you publish most. You can switch later: cutting, pacing, audio and color skills carry over from one program to the next.
| Software | Platform | Price model | Best for |
|---|---|---|---|
| DaVinci Resolve | Windows, macOS, Linux | Free, paid Studio version | Pro-level editing and color grading for free |
| iMovie | macOS, iOS | Free | First edits on a Mac or iPhone |
| CapCut | Windows, macOS, mobile | Free tier, paid plans | Shorts, phone editing, auto-captions |
| Filmora | Windows, macOS | Free version, paid plans | Beginners who want templates and effects |
| Adobe Premiere Pro | Windows, macOS | Subscription | Professional projects, teams already in Adobe apps |
| Final Cut Pro | macOS | One-time purchase | Fast professional editing on a Mac |
| Revid | Browser | Free sign-up with free credits to try, paid plans from $39/month | AI-made Shorts, auto-edited talking videos, captions, direct publishing |
Quick decision rules:
- Starting out on a Mac: iMovie, then Final Cut Pro when you outgrow it.
- Want free and professional: DaVinci Resolve, if your computer can handle it.
- Mostly Shorts, edited on your phone: CapCut.
- Working with a team or with After Effects graphics: Premiere Pro.
- Want Shorts without editing footage by hand: an AI tool such as Revid (covered below).
Check the system requirements on the maker's site before you commit. If a pro editor stutters on your laptop, turn on proxy files (lighter copies of your footage used while editing); Resolve, Premiere Pro and Final Cut Pro all support them.
How to edit a YouTube video, step by step
- Organize before you open the editor. One folder per video, with subfolders for footage, audio, graphics and exports. Rename clips by scene so you can find them later.
- Watch everything and mark the keepers. Drop markers on good takes and delete obvious failures now, not mid-edit.
- Build the rough cut. Lay clips on the timeline in story order. Cut flubs, repeated takes and long pauses. Don't add music or effects yet.
- Tighten into a fine cut. Trim the start and end of every clip, remove breaths and dead air in talking segments, and cover jump cuts with B-roll. Get to the point of the video in the opening seconds.
- Fix the audio. Remove background noise, even out dialogue levels, lower music under speech and add sound effects only where they mark a moment.
- Correct, then grade color. Fix white balance and exposure so all shots match, then add a look.
- Add text, graphics and captions. Lower thirds for names, on-screen labels for key points, captions for viewers who watch without sound, and an end screen.
- Review and export. Watch the full cut once on a phone and once on a large screen, then export and upload with a title, thumbnail and chapters.
Editing techniques that keep viewers watching
Pacing: match the speed to the content
Pacing is how long each shot stays on screen before something changes. Gaming highlights and fast tutorials want quick cuts; emotional moments and scenery want longer shots. The common mistake is uniform pacing: vary it so the viewer feels a change when the video moves to a new idea.
Cuts that hide the edit
| Cut | What it does | Use it for |
|---|---|---|
| Jump cut | Removes a pause inside one shot | Talking heads, keeping energy up |
| J-cut | The next shot's audio starts before its picture | Leading into a new scene or speaker |
| L-cut | Audio continues after the picture changes | Showing B-roll while someone keeps talking |
| Match cut | Joins shots with a similar shape or motion | Scene changes without a transition effect |
| Cutaway | Covers a cut with related footage | Hiding jump cuts, showing what you describe |
Transitions: a straight cut is the default
Use a straight cut almost everywhere. Save a fade for time passing and a quick swipe or whip for a change of location. A flashy transition on every cut tells viewers they are watching an edit instead of a story.
Timing: cut on action and right after the line lands
Cut while something moves (a hand reaching, a head turning) and the cut disappears. Cut a beat after a joke or reveal lands, not a second later. Leaving the camera running after someone finishes speaking is the most common sign of an amateur edit.
Use your retention graph as an editing brief
In YouTube Studio, open a video's analytics and look at audience retention. A steep drop in the opening means your intro is too slow; a dip in the middle points to a segment to tighten. Apply what you learn to the next edit, not just the next upload.
How to edit YouTube Shorts (and cut them from long videos)
Square or vertical videos up to 3 minutes long count as Shorts (for uploads since October 15, 2024). Edit them in 9:16 with a different rhythm than long videos:
- Open on the payoff or the question: no logo, no intro.
- Keep text and captions where the Shorts buttons won't cover them; check with the YouTube Shorts safe zone template.
- Change something on screen often (angle, zoom, text, B-roll) so the frame never sits still.
- End on a line that loops back to the start or sets up your next Short.
For a full walkthrough, read our guide on how to edit YouTube Shorts.
Prompt to try
Make a 40-second vertical YouTube Short titled '3 editing mistakes that make your videos look amateur'. Open on the hook 'Your cuts are giving you away.', then show each mistake with quick B-roll and bold captions. Fast pacing, upbeat music, and end on a line that loops back to the opening.
Turning a long video into Shorts
- Scrub your finished long edit for moments that work without context: a tip, a reveal, a strong opinion, a punchline.
- Start each clip on its most interesting line, not on the setup.
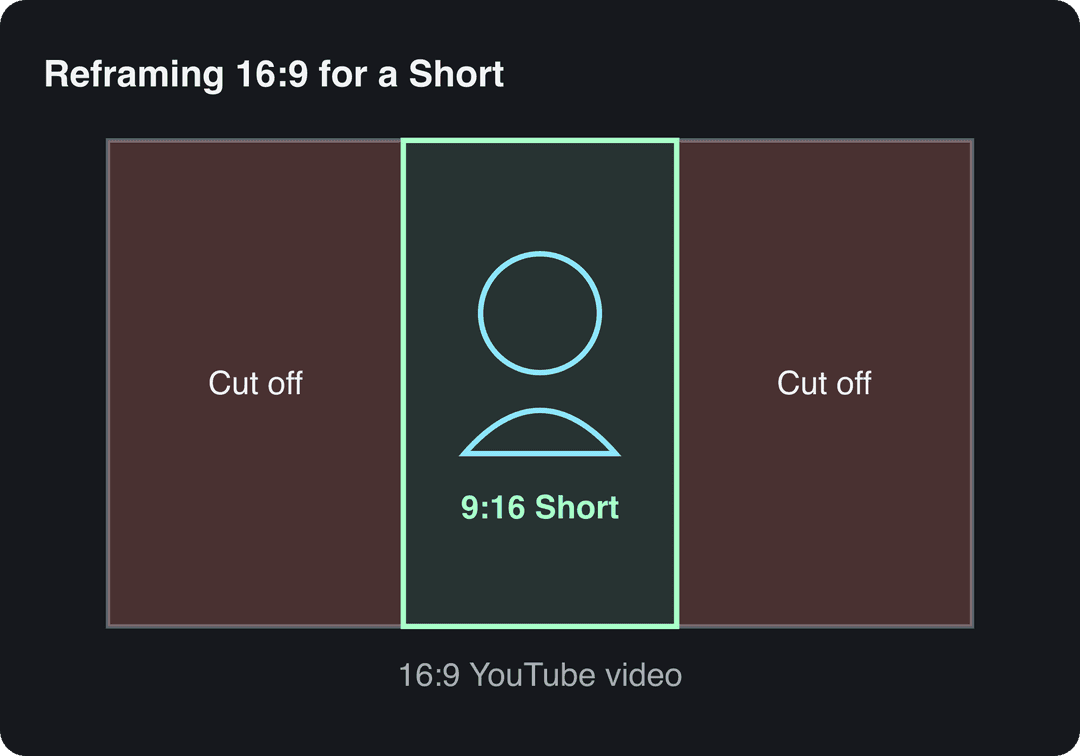
- Reframe from 16:9 to 9:16 and keep the subject centered.
- Add captions and a short on-screen title.
How long should the Short be?
Shorter is not automatically better. In Revid's analysis of 176,367 TikToks with 1,000+ likes posted between October 2025 and October 2026 (TikTok data, not YouTube), every length bucket from under 15 seconds to 10 minutes had a median between 58K and 76K views. Videos under 15 seconds had the lowest median (58K) but the most shares per view (1.41 per 100). The sample only contains videos that already passed 1,000 likes, so it shows what successful videos have in common, not a cause; the method is in our study of what makes TikToks go viral. Decision rule: cut each Short to the length its idea needs, and go very short when the goal is shares.
Length alone barely moves views: every bucket lands between 58K and 76K median views (the 790 videos over 10 minutes are a small, unusual group). Clips under 15 seconds get shared the most per view.
Source: Revid analysis of 176,367 TikToks with 1,000+ likes posted between Oct 1, 2025 and Oct 16, 2026 (61,203 creators)
Show the data
| Median views | Share that passed 1M views | Shares per 100 views | |
|---|---|---|---|
| Under 15 s | 57.6K | 11.6% | 1 |
| 16 to 30 s | 64.9K | 12.3% | 1 |
| 31 to 60 s | 61.8K | 11.8% | 1 |
| 61 to 90 s | 70.5K | 12.2% | 1 |
| 91 s to 3 min | 63.4K | 11.1% | 1 |
| 3 to 10 min | 76.4K | 12.4% | 1 |
| 10 min+ | 129.6K | 13.8% | 0 |
How to edit YouTube videos with AI
AI handles the repetitive parts of editing well: finding the best moments, removing pauses and filler words, captioning, cleaning audio and reframing for vertical. Story, pacing and what to cut are still your call.
| Task | What the AI does | Example tools |
|---|---|---|
| Edit by transcript | Cut video by deleting words in its transcript, remove filler words | Descript |
| Long video to Shorts | Finds standalone moments, reframes to 9:16, adds captions | OpusClip, Revid |
| Auto-edit a talking video | Turns a raw recording into an edited cut with motion graphics | Revid |
| Captions | Transcribes and styles captions automatically | CapCut, Revid |
| Audio cleanup | Removes noise and evens out voice | Descript, Revid |
| Make a Short from a script | Writes visuals, voice-over, captions and music around your idea | Revid |
If most of your work is podcasts or long talking recordings, transcript editing is the fastest method: Descript starts at $24/month ($16 billed annually) and has a free plan with 60 media minutes. Our Revid vs Descript comparison covers when each fits.
Input
Your video as it is
Output
Shares are of all 77,016 videos built in the period, including tools not shown.
Source: Revid product analytics (Amplitude), event project_built grouped by tool slug, September 29 to October 28, 2026, 77,016 builds
Show the data
| Videos built | Share of all videos (%) | |
|---|---|---|
| Prompt to video | 33.5K | 43.5% |
| Voice-over video from a script or link | 14.7K | 19.1% |
| Music video from a song | 12.4K | 16.1% |
| Audio to video | 4.3K | 5.6% |
| Article to video | 1.3K | 1.7% |
| Character swap | 1.2K | 1.6% |
| Captions on your own video | 999 | 1.3% |
| Clips from a long video | 973 | 1.3% |
| Talking avatar | 745 | 1% |
Edit a YouTube video with Revid
- Paste a YouTube link into the YouTube clip maker to get vertical clips from a long video, or upload a talking video to Auto Edit, where your key lines become motion graphics.
- Add or restyle captions with the AI caption generator: 30 caption styles and automatic captions in 100+ languages.
- Open the timeline editor to change any scene, swap a visual or fix a caption.
- Export in 720p, 1080p or 4K at 30 or 60 fps, then publish or schedule to YouTube, TikTok and Instagram from one queue.
Turn a narration file into a video
If you record the voice-over first, upload it as an MP3, WAV or M4A file to Revid's audio to video tool. Revid builds the visuals around your recording and syncs the captions to your words; you can then adjust any scene in the timeline editor. This suits faceless channels that script and record before thinking about visuals.
Can you monetize videos edited with AI?
Yes, if the final video shows your creative vision and gives viewers educational or entertainment value. YouTube does not monetize mass-produced AI videos built from generic templates, or compilations of unrelated AI clips stitched together to shock. Realistic AI content (a real person appearing to say something they didn't, a realistic scene that never happened) must be disclosed with the "AI use" setting in YouTube Studio; AI-written scripts, captions and titles don't need disclosure.
How do you re-edit a video after it's uploaded?
It depends on what you still have: the project file, only the exported file, or only the published video.
- Published on YouTube: in YouTube Studio, open Content, select the video and choose Editor. You can trim or cut sections, blur faces or areas, add audio from YouTube's library and add an end screen, and the video keeps its URL, views and comments. Changes can take a while to process on long videos.
- What you can't do on YouTube: replace the video file. A new hook, a recolored cut or a different structure means uploading a new video, which starts at zero views on a new URL. Decision rule: if a few seconds need to go, use Studio's editor; if the edit itself is the problem, re-upload.
- You still have the project file: reopen it, change what you need and export again. Keep project files and source media together until a video has stopped getting views.
- You only have the exported MP4: import it as a single clip. You can trim, cut, reframe, re-caption, adjust color and add music, but titles, music and voice are baked in and can't be separated.
Revid projects stay editable in the timeline editor, so you can change a scene or caption and export again instead of starting over.
Color, audio and export settings
Color: correct first, then grade
Correction makes shots accurate and consistent: white balance so whites look white, exposure so faces are readable, and matching shots filmed at different times. Grading is the look you add afterwards, warmer for cozy vlogs, cooler with more contrast for drama. Grade before correcting and you end up grading around the errors.
Audio: what viewers notice first
Viewers forgive soft footage faster than bad sound. Record close to the microphone, then in the edit remove hum and room noise (a background noise cleaner helps), keep dialogue at a steady level, lower music under speech and put a limiter on the master track so peaks don't distort.
Export and upload
- Export at the resolution and frame rate you filmed in. MP4 with H.264 is the safe default; YouTube Help lists its recommended upload encoding settings if you want exact bitrates.
- By default uploads are limited to 15 minutes; verify your account to upload longer videos, up to 256 GB or 12 hours, whichever is less.
- Titles can be up to 100 characters.
- Custom thumbnails need a verified account. YouTube recommends 3840x2160 (16:9, minimum width 640 px), with files up to 50 MB on desktop but only 2 MB on mobile.
- Upload through YouTube Studio on YouTube. Lower resolutions are ready first and HD finishes processing later, so wait before judging quality.
| Problem | Likely cause | Fix |
|---|---|---|
| Stripes in skies or gradients (banding) | Heavy grading on compressed footage | Grade lighter, add light film grain, export at higher quality |
| Crackly or distorted voice | Audio peaks clipping | Lower the gain, add a limiter |
| Blocky or soft video on YouTube | HD still processing, or low export quality | Wait for HD processing, then re-export at higher quality if needed |
| Editor lags or crashes | Footage too heavy for your computer | Use proxy files, close other apps |
| Audio drifts out of sync | Variable frame rate phone footage | Convert to a constant frame rate before editing |
Match the edit to your content type
| Content | Pacing | Edit style | What to add |
|---|---|---|---|
| Gaming, entertainment | Fast | Quick cuts on action, reaction zooms | Sound effects, on-screen text for reactions |
| Tutorials, education | Steady | Cut repetition, keep every step | Screen recordings, zooms on details, chapters |
| Vlogs, travel | Varied | Natural cuts, longer scenic shots | Music cues, time-lapses between places |
| Talking head, commentary | Fast to medium | Jump cuts to remove pauses | B-roll, captions, text for key points |
| Shorts | Fast | Hook first, no intro | Captions inside the safe zone, a looping ending |
Your own style comes from a few repeated choices (a caption look, a color grade, a sound you use for transitions), not from adding every effect your editor offers.
Build a workflow you can repeat
- Same folders every time: footage, audio, graphics, project, exports.
- Shortcuts for what you do constantly: cut, ripple delete, playback speed, timeline zoom. Remap them if the defaults feel awkward.
- Templates: intro and outro, lower thirds, end screen, caption style and an export preset.
- Backups with the 3-2-1 rule: three copies, on two kinds of storage, one off-site (for example your computer, an external drive and cloud storage).
- Batch the work: script and film several videos, edit them in one session, then cut Shorts from all of them at the end.
FAQ
What is the best free software to edit YouTube videos?
DaVinci Resolve is the most capable free editor and runs on Windows, macOS and Linux. On a Mac or iPhone, iMovie is the easiest start, and CapCut's free tier exports in 1080p with auto-captions, which suits Shorts.
Can you edit YouTube videos on your phone?
Yes. CapCut, and iMovie on iOS, handle cuts, text, music and captions on a phone, which is enough for Shorts and simple vlogs. Long videos with many layers are faster to edit on a computer.
Does labeling AI content hurt a YouTube video's reach?
No. YouTube says disclosure alone does not limit a video's audience or its eligibility to earn, but creators who repeatedly fail to disclose risk labels being applied, removal or YPP suspension. Since May 2026, YouTube also labels undisclosed videos with significant photorealistic AI automatically.
Do you need a powerful computer to edit YouTube videos?
Not to start. iMovie and CapCut run on ordinary laptops and Revid runs in the browser, while DaVinci Resolve and Premiere Pro want a stronger processor, more RAM and a good graphics card. Proxy files help when a pro editor lags.
Sources
- Revid analysis of 176,367 TikToks with 1,000+ likes posted between Oct 1, 2025 and Oct 16, 2026 (61,203 creators)
- Revid product analytics (Amplitude), event project_built grouped by tool slug, September 29 to October 28, 2026, 77,016 builds
- Tubular Labs (Tube Trends column on TVREV), Tube Trends: Over 75% Of YouTube Views Came From Shorts In 2025 (January 2026)
- YouTube Official Blog, Tall updates coming to Shorts (October 2024)
- YouTube Official Blog, New opportunities to earn and changes to the YouTube Partner Program (August 2026)
Charts and figures checked on November 6, 2026.