How to Add Green Screen to a Video: Shoot, Key and Composite
How to add green screen to any video: the backdrop, lighting and camera settings that make a clean key, the editor steps, and fixes for spill, halos and jagged edges.
On this page
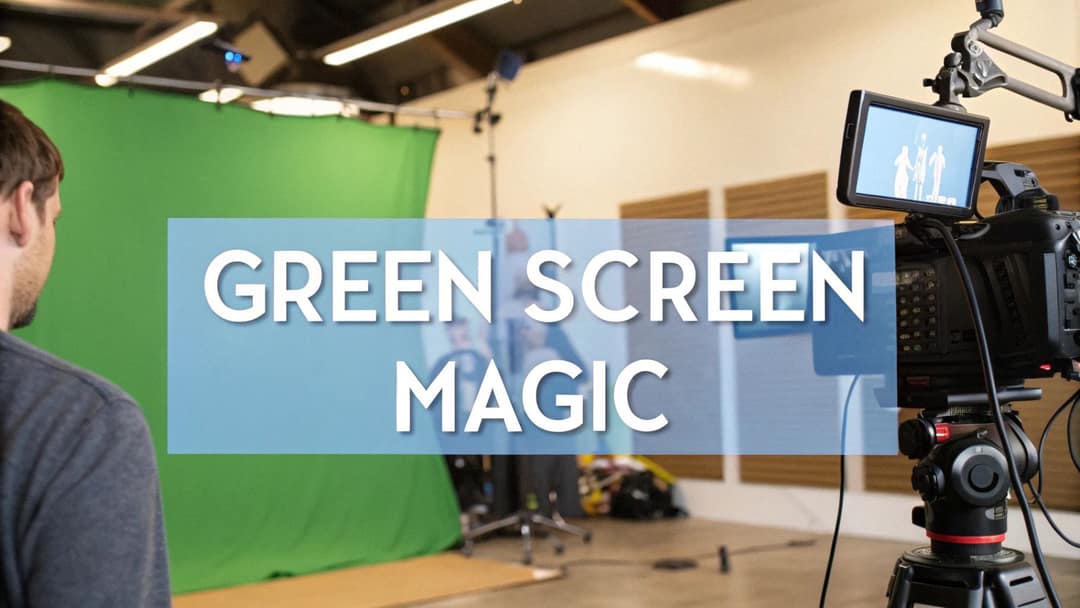
To add green screen to a video, film your subject in front of an evenly lit green backdrop, place the clip on a track above your new background in an editor, and apply its chroma key effect to make the green transparent. Then refine tolerance, edge feather and spill suppression until no green fringe is left.
Green screen is worth learning for social video, not only for film work: among 21,037 TikToks whose production format Revid classified, green-screen memes reached a median of about 204,000 views, roughly 2.2x the 91,000 of talking-head videos, according to Revid's short-form video statistics. The catch is that most bad keys are decided before you open the editor. Uneven light and wrinkles on the backdrop cause more jagged edges than any software setting can repair.
- Median views of green-screen meme TikToks
- 204K
- Revid short-form video statistics
- Green-screen memes' median views vs. talking-head videos
- 2.2x
- Revid short-form video statistics
- Virtual production market value in 2023, green screen work included
- $2.11B
- Grand View Research
- Projected annual growth of virtual production through 2030
- 18.6%
- Grand View Research
How green screen (chroma key) works
Chroma keying tells your editor to treat one color as transparent, so whatever sits on the track below shows through. Green is the default because it is far from skin tones and most clothing, and camera sensors capture green with the most detail, so a green backdrop keys cleanly with less light than blue.
Blue screen is the better choice when your subject wears green or holds green props. For a longer technical primer on color, footage formats and keying, see Solveigmm's guide to chroma key and green screen footage.
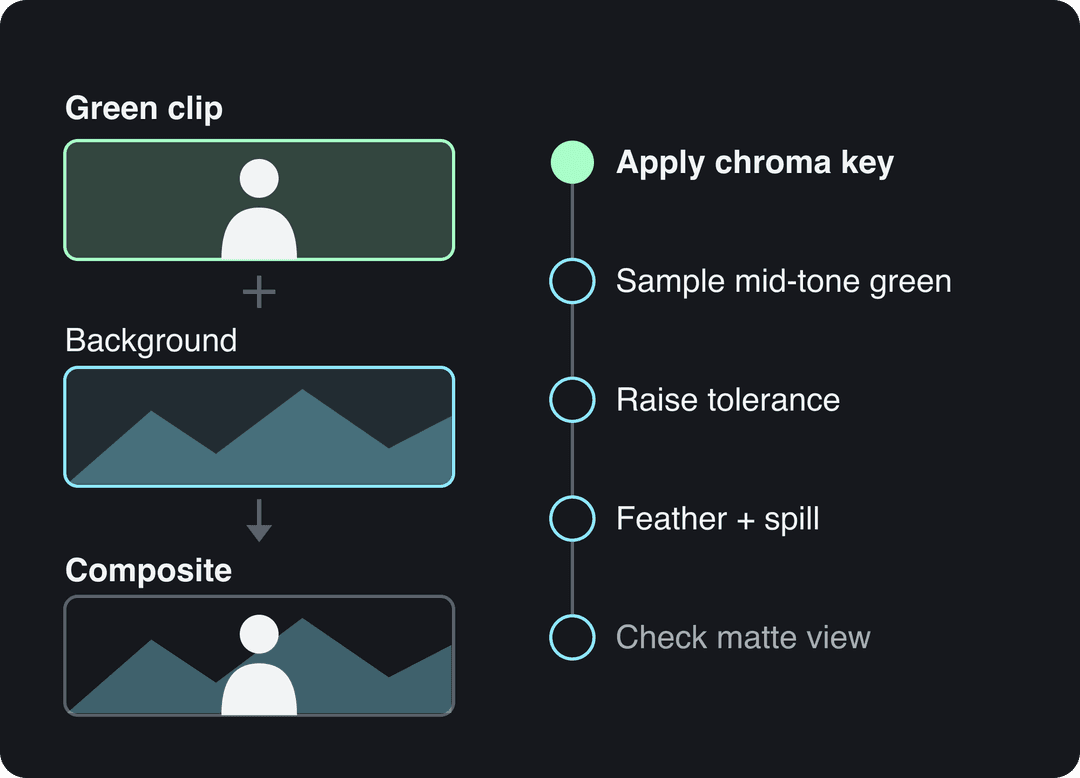
How to add green screen to a video, step by step
These steps work in almost every editor, from Premiere Pro to CapCut on a phone. Only the name of the effect changes.
- Get clean green screen footage. Shoot it yourself (lighting and camera settings are below) or use a clip you already have.
- Import both clips. Put the new background on the bottom track and the green screen clip on the track directly above it.
- Apply the chroma key effect to the green screen clip: Ultra Key in Premiere Pro, Keyer in Final Cut Pro, 3D Keyer or Delta Keyer in DaVinci Resolve, Chroma Key in Filmora, Chroma key in CapCut, the green screen filter in Clipchamp.
- Sample the green with the eyedropper on a mid-tone area of the backdrop, not the brightest or darkest patch.
- Raise tolerance (called similarity, strength or intensity in some editors) until the background disappears. Stop as soon as edges start eating into hair or clothing.
- Clean the edges. Add a small feather or edge choke, then turn on spill suppression to pull the green tint off skin and hair.
- Check the matte view if your editor has one (alpha or black-and-white view). The background should be solid black and your subject solid white, with no grey patches.
- Composite and export. Scale and position the subject, match its color to the background, then export.
Adding a green screen effect clip on top of your video
Sometimes "add green screen to video" means the opposite: you downloaded a green screen effect (a meme reaction, an explosion, a subscribe button) and want it over your own footage. Reverse the stack. Your footage goes on the bottom track, the green screen effect goes above it, and you key the effect clip with the same chroma key tool. Then scale it, position it and trim it to the moment you want.
Which green screen video editor should you use?
Any editor with a chroma key tool will do the job. Pick by platform and how much control you need.
| Editor | Chroma key tool | Platform | Pricing model | Best for |
|---|---|---|---|---|
| DaVinci Resolve | 3D Keyer, Delta Keyer (Fusion) | Windows, Mac, Linux | Free version, paid Studio | The best free option with pro-level keying and color |
| Adobe Premiere Pro | Ultra Key | Windows, Mac | Subscription | Editors already in the Adobe ecosystem |
| Final Cut Pro | Keyer | Mac | Paid (check Apple's current pricing) | Fast keying on a Mac |
| Filmora | Chroma Key | Windows, Mac | Free with watermark, paid plans | Beginners who want a simple interface |
| Clipchamp | Green screen filter | Browser, Windows | Free and paid plans | Quick keys without installing pro software |
| CapCut | Chroma key | Phone, desktop, browser | Free tier, paid plans | Editing on a phone and posting to TikTok |
If you are deciding between manual editing and generating videos with AI, our Revid vs CapCut comparison lays out where each fits. Browser editors such as WeVideo also offer a green screen effect, and the workflow is the same as the steps above.
How to make a green screen (backdrop options)
The backdrop only needs to be one flat, matte shade of green with no wrinkles. Here is how the common options compare:
| Backdrop | Works best for | Watch out for |
|---|---|---|
| Chroma key fabric (muslin or polyester) on a stand | Most home studios, full or half body | Wrinkles: stretch it tight with clamps or steam it |
| Collapsible pop-up screen | Small rooms, desk setups, streaming | Covers only a small area, so frame tight |
| Wall painted with chroma key paint | Permanent studios | Needs a matte finish, and you cannot move it |
| Green poster or foam board | Head-and-shoulders shots, product close-ups | Only fills a close frame |
| Green bedsheet | Testing the idea before buying anything | Thin, shiny fabric wrinkles and lets light through |
A larger backdrop gives you more freedom to move and to frame wider, so buy for the widest shot you plan to film.
Entry-level green screen setup
You do not need a studio for clean results. An entry-level green screen kit looks like this:
- A green backdrop from the table above, pulled smooth
- Soft lights for the screen (LED panels with softboxes are the easiest to control) plus one or two for you
- A tripod, so the camera never moves between takes
- A camera or phone that records at least 1080p and lets you lock focus and exposure
- A microphone close to the speaker, since bare rooms with a backdrop tend to sound hollow
- An editor with a chroma key tool (DaVinci Resolve, CapCut and Clipchamp all have free versions)
How to light a green screen
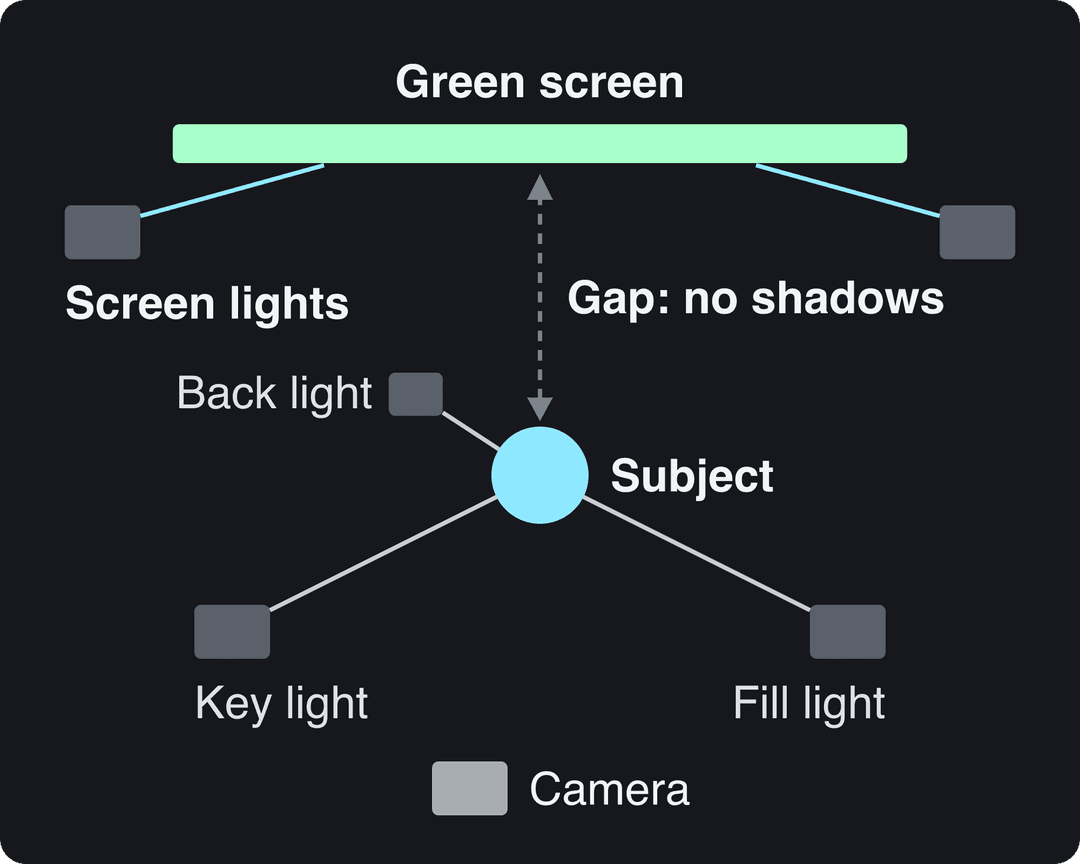
Lighting decides whether your key takes seconds or hours. Light the screen and the subject as two separate jobs:
- The screen: aim soft, diffused light at it from both sides so the green looks the same brightness edge to edge, with no hotspots or dark corners.
- The subject: use three-point lighting. The key light sits at roughly a 45-degree angle to the subject, a softer fill light on the opposite side reduces harsh shadows, and a back light behind the subject draws a bright edge around hair and shoulders that separates them from the green.
- The gap: move the subject forward until their shadow falls on the floor, not the screen. Distance also cuts the green light that bounces back onto skin and clothes (spill).
- Consistency: daylight from a window drifts during a shoot, so if you combine it with lamps, check the footage between takes. If your camera has zebras or false color, use them to confirm the screen is evenly exposed.
For a look at how a professional team planned direction, color temperature and shadows on a real shoot, see a green screen VFX case study from My Perfect Cousin.
The index leans toward videos that surface in hashtag and keyword searches, so its view counts run high: compare the groups, not the absolute numbers.
Source: Revid TikTok index: 2,377,477 TikToks with AI labels per video, snapshot of Sep 15, 2026. Median views estimated from view buckets.
Show the data
| Median views | Share past 1M views | |
|---|---|---|
| Drone | 173.9K | 27.9% |
| Steady cam | 162.7K | 26.2% |
| Screen recording | 159.9K | 23.8% |
| Handheld | 140.9K | 25.6% |
| POV | 139.9K | 26% |
| Tripod | 117K | 23.6% |
| Selfie | 67K | 16.3% |
How to record a video with a green screen background
Camera settings matter almost as much as light. Use these as defaults:
| Setting | Recommendation | Why |
|---|---|---|
| Resolution | At least 1080p, 4K if you can | More pixels at the edges means a cleaner key and room to reframe |
| Frame rate | 24 or 30 fps; 60 fps if you want slow motion | Match the frame rate of your background clip |
| Focus | Manual, locked on the subject | Autofocus hunting softens edges in the middle of a take |
| Exposure | Manual; keep the green bright but not blown out | An overexposed screen spills onto the subject and keys badly |
| Shutter speed | Fast enough to avoid heavy motion blur | Blurred edges smear green into the background |
| White balance | Locked, set to your lights | Drifting color shifts the shade of green mid-shot |
| Recording quality | The highest bitrate or least compressed format your camera offers | Compression blocks show up as rough keyed edges |
Frame with the final background in mind. Decide the background before you shoot, match the camera height and angle to its perspective (an eye-level street needs an eye-level camera), and leave space around the subject so their movement never leaves the green. Tape marks on the floor show talent where to stand and where imaginary objects will be, which keeps eye lines believable.
Prompt to try
A 30-second vertical video of a travel host standing on a rainy neon-lit Tokyo street at night, eye-level camera, opening with the hook "This street changes after midnight." Cinematic realistic style with soft rim light, light film grain and synced captions.
The index leans toward videos that surface in hashtag and keyword searches, so its view counts run high: compare the groups, not the absolute numbers.
Source: Revid TikTok index: 2,377,477 TikToks with AI labels per video, snapshot of Sep 15, 2026. Median views estimated from view buckets.
Show the data
| Median views | Share past 1M views | |
|---|---|---|
| Virtual | 172.1K | 24.8% |
| Outdoor | 133.5K | 25% |
| Indoor | 111.9K | 22.9% |
| Mixed | 111K | 21% |
How to add a background to a green screen video so it looks realistic
A clean key is half the job. The composite looks real when the subject seems lit by the same world as the background:
- Pick a background that matches your lighting. If your key light came from the left, choose a background where the sun or main light source is also on the left.
- Match perspective. Keep the horizon of the background near the camera height you filmed at.
- Color match. Adjust the subject's color temperature, contrast and saturation toward the background, or grade both layers together at the end.
- Match sharpness. If the background is soft or out of focus, a perfectly sharp subject looks pasted on. Blur the background slightly more, or soften the subject a touch.
- Ground the subject. Add a soft shadow under the feet or behind the shoulders where the background would cast one.
- Use light wrap if your editor has it. It bleeds a little background color around the subject's edges, the way real light does.
- Add matching grain. A light layer of noise over the whole frame makes two sources read as one shot.
Backgrounds can be your own footage, stock clips or AI-generated scenes. If you want two clips side by side rather than one subject placed in a new world, split screen video editing is the better technique.
How to fix common green screen problems
| Problem | Likely cause | Fix |
|---|---|---|
| Green tint on hair, skin or light clothes (spill) | Subject too close to the screen, screen too bright | Move the subject forward, add a back light, use spill suppression |
| Jagged edges or holes in the subject | Uneven screen lighting, tolerance set too high | Even out the screen lights, lower tolerance, mask the problem area |
| Halo or fringe around the subject | Heavy compression, soft focus, too much feather | Record at higher quality, choke the edge, add light wrap |
| Green patches left in corners | Screen does not fill the frame, wrinkles cast shadows | Draw a garbage matte (a rough mask) around the subject to cut the edges |
| Key flickers between frames | Auto exposure or flickering lights | Lock exposure and white balance, use flicker-free lights |
| Fine hair disappears | Subject over-keyed | Key hair separately or protect it with a mask |
The best fix is prevention: shoot a short test, key it on the spot, and adjust lights before the real take.
How to turn a video into a green screen
If you filmed without a backdrop and need a green screen version of the clip (to reuse in another editor or hand to an editor), cut the subject out first. Use the AI background removal or masking feature in your editor, such as DaVinci Resolve's Magic Mask, then place a solid green color layer under the cut-out subject and export.
The rule is simple: if you control the shoot, use a real green screen; if the footage already exists, use AI masking. Masked edges are less precise than a real key, especially around hair and fast movement.
Green screen video production: do it yourself or hire a studio?
Do it yourself when you film a single person, the camera stays still, and the video is for social media or internal use. A pop-up screen, soft lights and a free editor are enough for talking heads, reaction formats and tutorials.
Hire a green screen studio or production company when you need full-body movement, several people, camera moves that must track with the background, or a client and broadcast deliverable. Studios have large painted walls that curve into the floor, controlled lighting and staff who key footage every day. Demand is growing: Grand View Research valued the virtual production market, which includes green screen work, at $2.11 billion in 2023 and projected 18.6% annual growth through 2030. For examples of how businesses use green screen in marketing, training and news, see Foundation Digital Media's green screen production overview.
Making the scene without a green screen in Revid
If your goal is to put a story or a presenter in a setting, rather than composite footage you filmed, you can skip the shoot entirely:
- Describe the moment in Revid's AI scene generator to get wide, medium and close-up shots that cut together.
- For a complete short from an idea, prompt to video writes the script and generates the scenes, voice-over, captions and music.
- For a presenter speaking in any setting, use a talking avatar.
- Adjust any scene in the timeline editor, export up to 4K, and publish directly to TikTok, Instagram and YouTube.
For footage you filmed yourself, a chroma keyer in one of the editors above is still the right tool. Once your composite is done, the caption generator adds synced captions in 100+ languages, and you can resize the video to 9:16 for Reels, Shorts and TikTok.
FAQ
Can you make a green screen video on your phone?
Yes. CapCut's Chroma key and iMovie's Green/Blue Screen effect on iPhone both key a green clip over a background. Put the phone on a tripod, lock focus and exposure, and light the backdrop evenly.
What should you not wear in front of a green screen?
Avoid anything green, plus shiny, sheer or finely patterned fabrics, which reflect green or flicker at the edges. Solid, matte colors that contrast with green key most cleanly.
Is a blue screen better than a green screen?
Only when your subject or props are green, since they would disappear in a green key. Otherwise green is the easier choice because cameras capture it with more detail and it needs less light.
Do you need a green screen to change a video background?
No. AI background removal can cut out a subject without one, but a real green screen gives cleaner edges around hair, fast motion and transparent objects.
How do you use green screen in WeVideo or other online editors?
The workflow is the same everywhere: put the background on the lower track, the green screen clip above it, apply the editor's green screen or chroma key effect, and sample the green. Then adjust the strength until the background is gone without cutting into the subject.
Sources
- Revid TikTok index: 2,377,477 TikToks with AI labels per video, snapshot of Sep 15, 2026. Median views estimated from view buckets.
Charts and figures checked on November 6, 2026.