How to Add Voice Over to Video: Record, Clean and Sync It Right
Record, clean and sync a voice over to any video with free editors, phone apps or AI voices, plus Revid data on how much narration short videos actually need.
On this page
To add a voice over to a video, write a script for the ear, record it 6 to 8 inches from the mic in a quiet room, and clean it (cut mistakes, reduce noise, normalize the volume). Then put it on its own track in your video editor and start each line on the cut it describes.
More narration is not better. In Revid's analysis of 176,367 TikToks with 1,000+ likes posted between October 2025 and October 2026, videos with under 40 characters of speech had a median of 123K views, and 20.2% passed 1M. Videos that talked from start to finish (300+ characters of speech) had 68K and 11.9%. Silent videos sat in between at 73K.
Videos with just a few spoken words (a line or two) beat both silent videos and videos that talk the whole way through, which were the most common and the weakest.
Source: Revid analysis of 176,367 TikToks analyzed by AI, with 1,000+ likes posted between Oct 1, 2025 and Oct 16, 2026 (61,203 creators)
Show the data
| Median views | Share that passed 1M views | |
|---|---|---|
| No speech | 73.3K | 14.3% |
| Under 40 | 122.7K | 20.2% |
| 40 to 120 | 97.2K | 17.6% |
| 120 to 300 | 91.6K | 16.8% |
| 300+ | 67.7K | 11.9% |
That sample only includes TikToks that already reached 1,000 likes, so it shows what strong videos have in common, not what causes views. The practical rule for a voice over still holds: narrate what the picture can't show, and cut every line that only describes what viewers can already see. Tutorials and explainers need more words, but every sentence should still earn its place.
- Median views for TikToks with under 40 characters of speech
- 123K
- Revid analysis of 176,367 TikToks
- Share of TikToks with under 40 characters of speech that passed 1M views
- 20.2%
- Revid analysis of 176,367 TikToks
- Median views for TikToks that talk start to finish (300+ characters)
- 68K
- Revid analysis of 176,367 TikToks
- AI voices available in Revid, in 70+ languages
- 1,000+
- Revid
How to add voice over to a video: the steps at a glance
- Write the script for the ear and plan which line goes with which shot.
- Set up a quiet, soft room and a USB or XLR microphone.
- Record 10 seconds of room tone, then the script. Redo any flubbed sentence on the spot.
- Clean the track: cut mistakes, reduce noise, normalize, compress lightly.
- Import the voice and the video into an editor, put the voice on its own audio track and line each sentence up with its cut.
- Lower the music under the voice, add captions and export.
The sections below cover each step, then the phone and AI-voice shortcuts.
Write a script for the ear
Spoken scripts need short sentences with one idea each. Read the draft aloud twice. If you trip over a word or run out of breath, rewrite that sentence, because viewers will hear the stumble too.
Write in the order the viewer sees things. If the finished result appears at a certain moment, the line about it should land on that moment, not before. A two-column script makes this easy, and the last row shows the most underused move in narration: saying nothing.
| Scene | On screen | Voice-over line |
|---|---|---|
| 1 | Close-up of the finished cake | "This cake takes one bowl and no mixer." |
| 2 | Dry ingredients going into the bowl | "Dry ingredients first, all at once." |
| 3 | Batter poured into the tin | "Pour it while the oven heats." |
| 4 | Knife cutting the first slice | (No line. Let the shot breathe.) |
For more structures (explainers, ads, tutorials), see these voice over script examples.
Prompt to try
Make a 30-second vertical voiceover video for a one-bowl chocolate cake recipe. Open on the finished cake with the hook "This cake takes one bowl and no mixer." Use one short spoken line per shot in a warm, friendly voice over close-up kitchen visuals, and leave the final slicing shot with music only.
Set up your recording space and microphone
You have two main microphone options:
- USB microphones plug straight into your computer. They are affordable, simple, and good enough for YouTube, tutorials and social videos.
- XLR microphones connect through an audio interface. They give more control over gain and sound, and they make sense if you record often or plan to upgrade over time.
The room matters more than the mic. A cheap USB mic in a quiet, treated closet beats an expensive mic in an echoey kitchen.
- Go small and soft. A walk-in closet full of clothes absorbs reflections far better than an empty room.
- Kill the background noise. Turn off the AC, unplug buzzing appliances, close windows and silence your phone.
- Cover hard surfaces. Hang a blanket behind you and put pillows on bare desks. Hard walls bounce sound back into the mic.
Record clean takes
- Keep a steady distance of 6 to 8 inches. Moving closer and farther makes the volume rise and fall.
- Speak slightly across the mic, not straight into it, or use a pop filter. Both stop the harsh pops on "p" and "b" sounds.
- Wear headphones so you hear problems (hum, clipping, mouth clicks) while recording, not after.
- Record in WAV at 48 kHz, the usual sample rate for video projects. Mismatched sample rates are a common cause of drift later.
- Restart the sentence, not the take. When you flub a line, pause, breathe and read that sentence again. You will cut the bad version in editing.
- Stand up and keep water nearby. Standing helps your breathing and energy, and water reduces mouth clicks.
Clean up the audio in Audacity
Audacity is free and does everything a voice over needs. Work in this order, because each step affects the next:
- Cut the mistakes. Scan the waveform for flubbed lines, long pauses and loud breaths, select them and delete.
- Reduce noise. Select your room-tone clip, open Noise Reduction and get the noise profile, then select the whole track and apply it. Use a light setting: too much makes the voice sound underwater.
- Normalize. This brings the track to a consistent peak level. Do it after noise reduction, otherwise you raise the noise too.
- Compress lightly. The Compressor evens out loud and quiet words for a smoother, broadcast-style sound. Go easy, or breaths and room noise come forward.
- Export as WAV for the editor.
If you would rather not adjust settings by hand, Revid's audio enhancer cleans up the audio in a recording or video you upload.
Sync the voice over with your video
Any timeline editor works. Adobe Premiere Pro and Final Cut Pro (Mac only) are the paid standards, and DaVinci Resolve has a free version that handles audio well.
- Import the video and the cleaned voice WAV.
- Separate the tracks: video on the video track, voice on its own audio track, music on another.
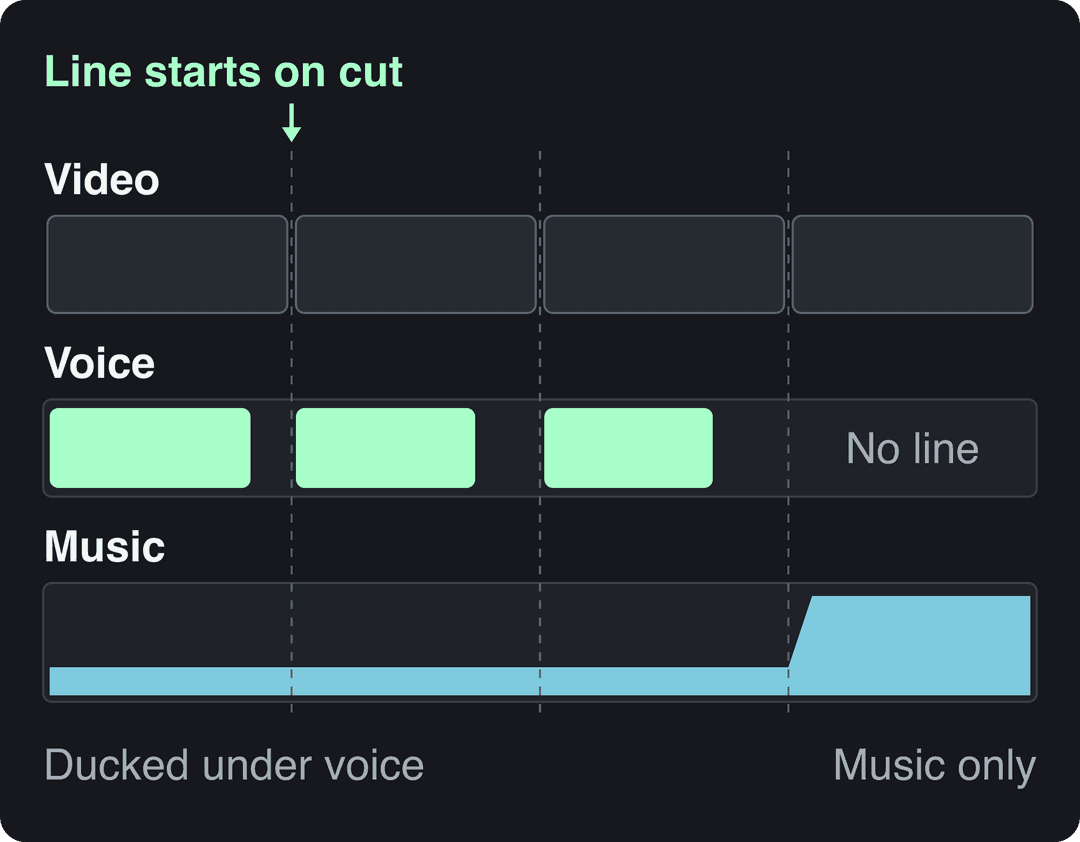
- Find the sync points. Every sentence that names something on screen is one. Split the voice clip between sentences and slide each piece so it starts on, or a few frames before, its cut.
- Fix mismatches in the picture, not the voice. If a shot is too short for its line, extend the shot or shorten the line. Speeding up the voice sounds wrong straight away.
- Duck the music under the narration. Premiere Pro does it automatically with Auto Ducking in the Essential Sound panel, and every editor lets you lower music with volume keyframes.
- Check it twice: once with your eyes closed (does the narration make sense alone?) and once on a phone speaker, where most short videos are heard.
For short clips you can skip the separate recording: Premiere Pro, iMovie, CapCut and Resolve can all record narration straight into the timeline while the video plays. You lose the separate cleanup pass, so record in your quietest room.
Add captions and export
Captions let people follow your narration with the sound off, and they hide the odd mumbled word. Most editors generate captions automatically, and Revid's caption generator adds synced captions to any video in 100+ languages. Read every caption once before export, because names and jargon are where auto-captions slip.
Export with the same frame rate as your footage. If you work in Premiere Pro, this walkthrough covers the export settings:
How to add a voice over on iPhone or Android
You can do the whole job on a phone:
- iMovie (iPhone): add the clip to a project, then use the Voiceover option to record while the video plays.
- CapCut (iPhone and Android): record narration from its audio tools, then trim and move the clip on the timeline.
- TikTok and Instagram editors: both include a voiceover recording option before you post, which is fine for quick clips.
Turn on Do Not Disturb so notification sounds don't land in the take, hold the phone close to your mouth, and record in the quietest small room you have.
Growth is $39/month with 2,000 credits. Generated music adds 20 credits per started minute; sound effects add 1 credit each. Videos per month = 2,000 divided by the 30 s cost, rounded down.
Source: Revid public API POST /api/public/v3/calculate-credits, workflow prompt-to-video, 9:16, run October 29, 2026
Show the data
| 30 s video (credits) | 60 s video (credits) | 30 s videos per Growth month | |
|---|---|---|---|
| Stock footage | 11 | 22 | 181 |
| Animated AI images, Standard | 18 | 35 | 111 |
| Animated AI images, Pro | 37 | 75 | 54 |
| AI video clips, Base | 110 | 220 | 18 |
| AI video clips, Pro | 341 | 682 | 5 |
| AI video clips, Ultra (Seedance 2.5) | 671 | 1,342 | 2 |
How to add an AI voice over with Revid
If you don't want to record at all, Revid generates the narration and syncs it for you. Pick the tool that matches what you already have:
- Footage with no narration: upload it to Add AI Voice to Silent Video, and Revid writes commentary for the clip and voices it.
- A script but no visuals: paste it into the voiceover video maker, which generates the voice, the scenes and synced captions.
- A recording but no visuals: upload the MP3, WAV or M4A to the audio to video converter to get a captioned video.
You choose from 1,000+ AI voices in 70+ languages, fix any scene in the timeline editor, export in 720p, 1080p or 4K, and publish straight to TikTok, Instagram or YouTube. Sign-up is free and new accounts get free credits to try it; regular creation then uses credits on a paid plan from $39/month. Voice cloning, so the AI narration sounds like you, starts on the Elite plan ($89/month); this guide on how to clone your voice with AI covers the options. For free AI voice options, see how to add AI voice to video for free.
Which voice over method should you use?
| Method | Best for | Speed | Control | Cost |
|---|---|---|---|---|
| In-app recording (iMovie, CapCut, TikTok) | Quick phone videos | Fast | Basic | Free |
| Separate recording + editor (Audacity with Premiere Pro, Final Cut Pro or Resolve) | YouTube videos, tutorials, brand films | Slowest | Frame by frame | Free to paid |
| AI voice (Revid) | Social clips, explainers, many languages, daily posting | Fastest | Timeline editing of every scene | Free credits to try, then paid plans from $39/month |
| Professional voice actor | Ads and brand films that run for months | Days | Depends on your direction | Per-project fee |
Decision rules:
- If your face or personality is the brand, record your own voice (or clone it).
- If you publish several videos a week or need other languages, use an AI voice and spend the saved time on the script.
- If the video is a paid ad or a flagship brand film, hire a voice actor or an agency.
Do you need to label an AI voice over?
Usually not for an ordinary narrator voice, but it depends on what the voice does.
- YouTube does not require disclosure for cloning your own voice for voiceovers or for AI-written scripts. It does require the "AI use" setting in YouTube Studio when realistic AI content makes a real person appear to say something they didn't, or shows a realistic event that didn't happen.
- TikTok requires creators to label AI-generated content that contains realistic images, audio or video.
- Neither platform reduces reach because of the label alone. Both say the disclosure does not by itself affect distribution.
One more YouTube rule matters for monetized channels: narrating material you didn't write, such as website text or news feeds, counts as reused content and can't be monetized. Write your own script.
Common voice over mistakes and how to fix them
| Mistake | What it sounds like | Fix |
|---|---|---|
| Robotic read | Flat, textbook delivery | Stand up, read to one specific person, stress one word per sentence |
| Plosives | Pops on "p" and "b" | Pop filter, or speak slightly across the mic |
| Mouth clicks | Small wet sounds between words | Drink water, delete clicks in editing |
| Volume drift | Voice fades in and out | Hold 6 to 8 inches from the mic, then normalize and compress |
| Echo | Bathroom-like room sound | Record in a smaller room with soft surfaces |
| Rushed pacing | Information is hard to follow | Rehearse while watching the video, cut words rather than speed up |
| Dead air | Long, awkward gaps | Tighten pauses, or let a strong shot play with music only |
| Music too loud | Words get buried | Duck the music under every line |
| Describing the obvious | "Here you can see a cake" | Say what the picture can't: why, how, what's next |
When to hire a professional voice actor
For a long-running ad or a brand film, a trained voice is often worth the fee. Voice-over agencies publish useful context on the market: see Outspoken Voices' overview of voice-over industry trends and Pro Voice Actor's article on voice-over industry growth.
If you are commissioning the whole video rather than only the narration, a production agency (for example, this corporate video production company in Dubai) handles scripting, voice and editing as one job.
FAQ
Do I need an expensive microphone to record a voice over?
No. An affordable USB microphone in a quiet room with soft furnishings sounds better than a high-end mic in an echoey space. Fix the room first, then upgrade the mic if you still hear problems.
Can I add a voice over to a video for free?
Yes. Record and clean the narration in Audacity, then sync it in the free version of DaVinci Resolve, or record straight into iMovie or CapCut on your phone.
Can I use an AI voice instead of my own?
Yes. AI voice tools read your script in a natural voice and sync it to the video, which is faster when you post often or need several languages. Disclose it when the voice realistically imitates a real person or the content shows realistic events that didn't happen.
How do I make my voice sound more engaging?
Read to one specific person instead of an audience, stress one key word per sentence, and vary your pace between points. Standing up and smiling while you record adds energy you can hear.
Why is my voice over out of sync after export?
Usually because phone footage uses a variable frame rate or the audio sample rate doesn't match the project. Convert the footage to a constant frame rate before editing, and record the voice at 48 kHz.