How to Edit Raw Video Footage: A Step-by-Step Guide for Beginners
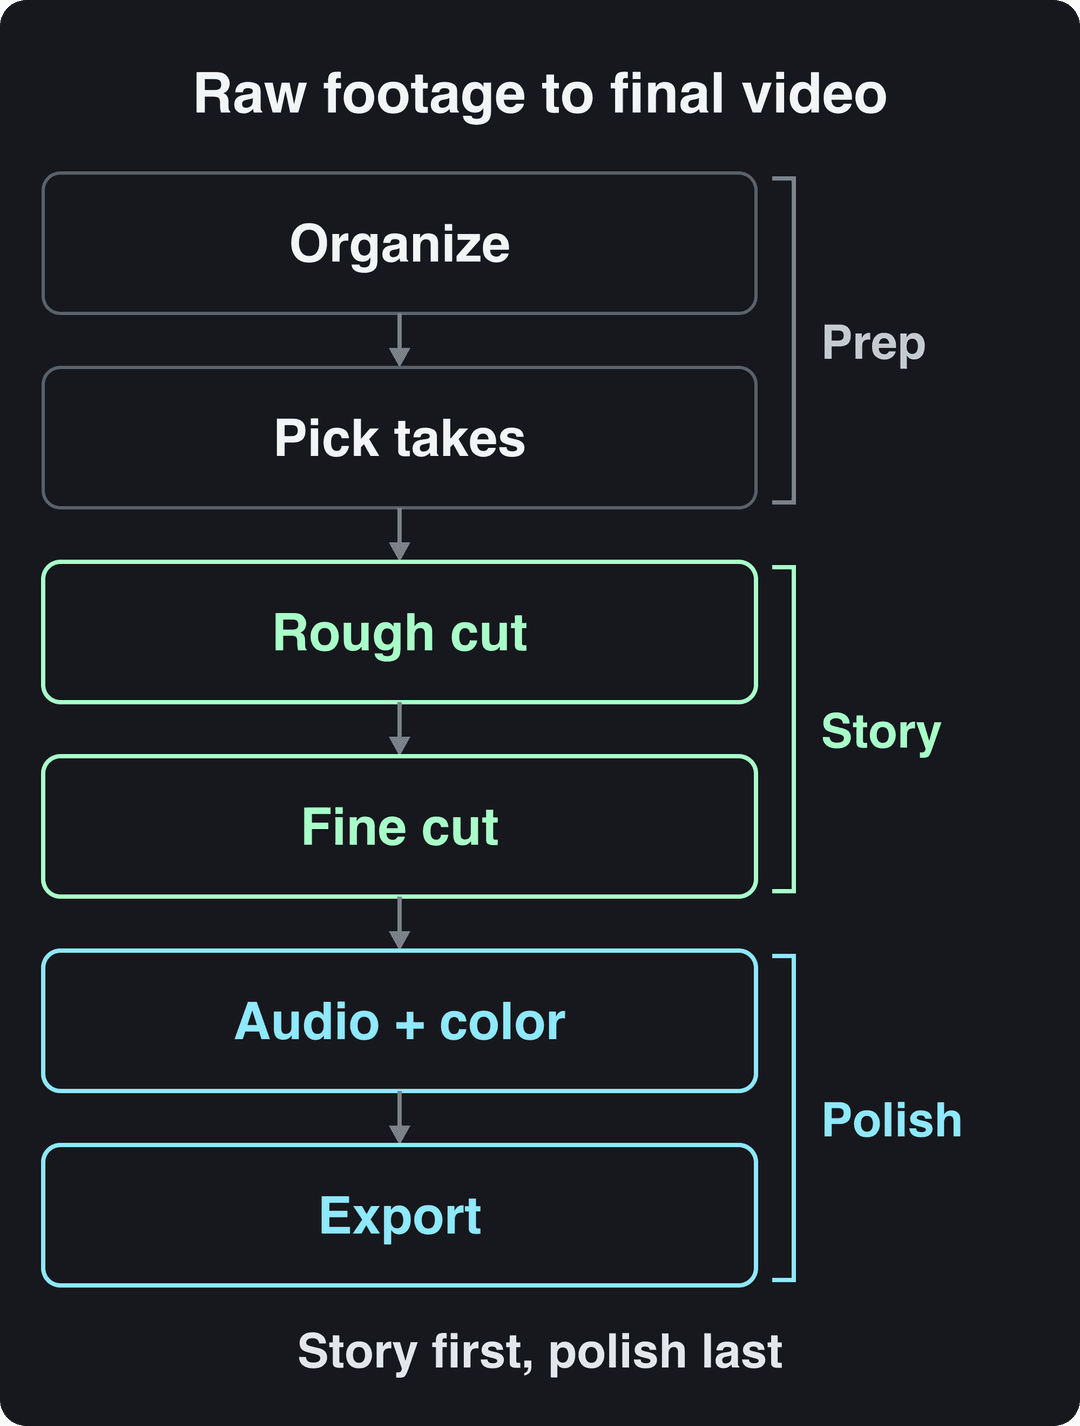
Editing raw footage follows the same order on every project: organize your clips, pick takes, build a rough cut, then a fine cut, then audio, color, captions and export. Here is each step, with free editors compared and export settings for every platform.
On this page
To edit raw video footage, back up and sort your clips, watch everything and mark the best takes, and assemble a rough cut in story order. Then tighten it, clean the audio, correct the color, add captions and export. A free editor such as DaVinci Resolve or iMovie handles every step.
The most common beginner mistake is polishing too early: adding transitions, color looks and music before the story works. Every cut you change afterward breaks that polish, so you end up doing the work twice. Lock the story first and the rest of the edit goes fast.
- Median TikTok views across every length bucket, under 15 s to 10 min
- 58K-76K
- Revid TikTok analysis
- Shares per 100 views for TikToks under 15 seconds, the highest of any length
- 1.41
- Revid TikTok analysis
- Maximum length of a YouTube Short
- 3 min
- YouTube Official Blog, October 2024
- Longest video TikTok accepts as an upload
- 60 min
How to edit raw video footage, step by step
Professional editors follow the same order on almost every project, because each stage depends on the one before it. Story decisions come first, polish comes last.
If you prefer to watch the whole process once before you start, this walkthrough goes from import to export:
Step 1: Back up and organize your footage
Copy every file from your camera or phone to your computer and to a second drive before you edit anything. Then create one project folder with five subfolders:
- Footage: the raw clips, never edited in place
- Audio: music, sound effects and voice-overs
- Graphics: logos, images and title cards
- Projects: your editor's project files
- Exports: finished videos
Rename clips so you can find any shot in seconds. "Day1_Scene3_Take2" beats a default camera filename every time, especially when someone else opens the project.
| Element | What it records |
|---|---|
| YYYYMMDD | Date of filming |
| Scene | Scene number or a short description |
| Take | Take number |
| Camera | Camera letter (A, B and so on) |
Inside your editor, mirror the same structure with bins or folders, and put dialogue, music and sound effects on separate audio tracks. It takes a few minutes now and saves hours of searching later.
Step 2: Watch everything and mark your selects
Watch all your footage once before cutting anything. Mark the usable part of each clip with In and Out points (the I and O keys in most editors), and add a marker or color label to your best takes.
Use J, K and L to play backward, pause and play forward. Tapping L more than once speeds playback up, which makes reviewing long clips much faster. If you shot a lot, write a one-line note per clip: what happens, whether the take is good, and any audio problem.
Step 3: Build a rough cut in story order
Drag only your selects onto the timeline, in the order the story needs, without worrying about exact timing. For a talking video, lay down the voice track first (the A-roll) and ignore the visuals for now. For a vlog or an event, order the clips by what happens, then ask whether someone who wasn't there would follow it.
A rough cut is supposed to be too long. Its only job is to prove the story works from start to finish. If it doesn't, change the order now, because restructuring later breaks your audio and color work. For long-form projects, the YouTube editing guide covers structure in more depth.
Videos with just a few spoken words (a line or two) beat both silent videos and videos that talk the whole way through, which were the most common and the weakest.
Source: Revid analysis of 176,367 TikToks analyzed by AI, with 1,000+ likes posted between Oct 1, 2025 and Oct 16, 2026 (61,203 creators)
Show the data
| Median views | Share that passed 1M views | |
|---|---|---|
| No speech | 73.3K | 14.3% |
| Under 40 | 122.7K | 20.2% |
| 40 to 120 | 97.2K | 17.6% |
| 120 to 300 | 91.6K | 16.8% |
| 300+ | 67.7K | 11.9% |
Step 4: Tighten it into a fine cut
Now make every second earn its place. These are the tools you will use most:
- Trim: drag the start and end of a clip to remove dead frames, slow starts and awkward pauses.
- Split: cut a clip at the playhead to remove a stumble from the middle. In Premiere Pro the shortcut is Cmd+K on Mac or Ctrl+K on Windows.
- Jump cuts: in talking-head videos, cut out pauses, filler words and repeated sentences. Viewers accept a visible jump far more readily than dead air.
- B-roll: cover jump cuts and abstract points with footage that shows what the speaker is describing.
- J-cuts and L-cuts: start the next clip's audio before its picture (J-cut), or let the previous clip's audio run under the new picture (L-cut). Cuts between people and scenes feel natural instead of abrupt.
- Transitions: use a straight cut by default. A dissolve can show time passing; flashy wipes usually distract from the story.
Cut on action when you can: if someone reaches for a door, cut to the next angle in the middle of the movement and the motion hides the edit. When nothing else can go without losing meaning, the picture is locked.
Step 5: Clean up and balance the audio
Viewers forgive soft footage much faster than bad sound. Work through the audio in this order:
- Clean the dialogue. Apply noise reduction to wind, hum or room noise; Revid's audio enhancer does this on an uploaded video if your editor's tools fall short.
- Level the voice so it stays the loudest element and sounds consistent from clip to clip.
- Duck the music: lower it under speech and bring it up in the gaps. Many editors can do this automatically.
- Add sound design (ambient sound, footsteps, room tone) to fill silent cuts and make scenes feel real.
- Use EQ to cut muddy low frequencies in voices so they sound clearer.
Step 6: Correct the color, then grade it
Color correction makes footage look accurate; color grading gives it a mood. Always correct first:
- Set white balance so white objects look white.
- Fix exposure and contrast so skin looks natural and highlights aren't blown out. Read your editor's waveform scope rather than trusting your screen.
- Match shots so clips from the same scene look like one place and time.
Then grade lightly. Warm tones feel energetic, cool tones feel calm, and muted saturation feels serious. Put the grade on an adjustment layer so you can change the look across the whole video at once.
If your camera recorded in a log profile or a RAW format, the footage looks flat and gray on purpose. Apply the conversion LUT from your camera maker, or your editor's color space transform, before you correct anything.
Step 7: Add captions and on-screen text
Captions let people follow the video with the sound off and make it accessible to viewers who are deaf or hard of hearing. Generate them automatically, then proofread names, numbers and brand terms by hand. On vertical video, keep captions and text clear of the app's buttons and description; the free TikTok safe zone checker shows exactly where they sit.
Step 8: Export for where the video will live
Export once, at the end, as an MP4 with the H.264 codec: TikTok's posting API recommends both, and Facebook recommends the same for Reels. Keep the frame rate you shot at, and match the resolution and shape to the platform.
| Platform | Shape | Resolution | Length rule to know |
|---|---|---|---|
| TikTok | 9:16 | 1080x1920 recommended | Uploads up to 60 minutes |
| YouTube Shorts | Vertical or square | 1080p or higher | Up to 3 minutes counts as a Short |
| Instagram Reels | 9:16 recommended (1.91:1 to 9:16 accepted) | At least 720 px, 30 FPS minimum | Reels over 3 minutes aren't recommended to non-followers |
| YouTube (long form) | 16:9 | 1080p or 4K | Over 15 minutes needs a verified account |
If you shot horizontal and need a vertical version, Revid's resize video tool converts a file to 9:16, 4:5, 16:9 or 1:1.
How long should your final edit be?
As long as the story needs and not one second longer. Length on its own does not decide how a short video performs. In Revid's analysis of 176,367 TikToks with 1,000+ likes posted between October 2025 and October 2026, every length bucket from under 15 seconds to 10 minutes had a median between 58K and 76K views. Videos under 15 seconds had the lowest median (58K) but the most shares per view (1.41 per 100). The full study of what makes a TikTok go viral has the method. The sample only includes videos that already passed 1,000 likes, so it shows patterns among strong videos, not causes.
Length alone barely moves views: every bucket lands between 58K and 76K median views (the 790 videos over 10 minutes are a small, unusual group). Clips under 15 seconds get shared the most per view.
Source: Revid analysis of 176,367 TikToks with 1,000+ likes posted between Oct 1, 2025 and Oct 16, 2026 (61,203 creators)
Show the data
| Median views | Share that passed 1M views | Shares per 100 views | |
|---|---|---|---|
| Under 15 s | 57.6K | 11.6% | 1 |
| 16 to 30 s | 64.9K | 12.3% | 1 |
| 31 to 60 s | 61.8K | 11.8% | 1 |
| 61 to 90 s | 70.5K | 12.2% | 1 |
| 91 s to 3 min | 63.4K | 11.1% | 1 |
| 3 to 10 min | 76.4K | 12.4% | 1 |
| 10 min+ | 129.6K | 13.8% | 0 |
The decision rule for your edit: cut anything that repeats, explains what the picture already shows, or delays the payoff. If the video still holds up after that pass, its length is right.
What is the best raw video editor for beginners?
The best raw video editor for a beginner is one you will open every day, not the most powerful one. Start with the editor that matches your device and budget, then move up when its limits get in your way.
| Software | Price model | Ease of use | Best for |
|---|---|---|---|
| iMovie | Free on Apple devices | Very easy | Simple cuts, titles and music on Mac or iPhone |
| DaVinci Resolve | Free version, paid Studio version | Moderate | Professional editing, color and audio at no cost |
| Adobe Premiere Pro | Subscription | Moderate to difficult | Industry-standard workflows and Adobe app integration |
| Filmora | Free version, paid plans | Easy | Templates and built-in effects |
| CapCut | Free tier, paid plans | Easy | Phone editing, 1080p export and auto-captions on the free tier |
If you're on a Mac and new to editing, start with iMovie. If you want one free tool you won't outgrow, learn DaVinci Resolve. If you'll work with agencies or other editors, Premiere Pro is the shared language. For more options sorted by need, see our picks of the best video editing software for beginners.
Free versions often limit you with watermarks or capped export quality, so export a test video before you commit hours to a project.
Raw footage vs camera RAW files
"Raw footage" usually just means unedited clips, and any editor above handles it. Camera RAW formats (such as Blackmagic RAW or ProRes RAW) are different: they store sensor data for maximum color flexibility, and not every editor opens them. DaVinci Resolve reads Blackmagic RAW natively; for other RAW formats, check your editor's supported formats page before you shoot.
RAW and high-resolution files are heavy. If playback stutters, create proxies (lightweight copies your editor uses while you cut and swaps back for the export). Resolve and Premiere Pro both support them.
How to edit faster as a beginner
Speed comes from habits more than talent:
- Learn ten shortcuts: In and Out points, J, K and L playback, split at playhead, ripple delete and undo cover most of a basic edit. Print your editor's shortcut list and keep it next to the keyboard.
- Set up your computer: 8GB of RAM is a minimum and 16GB or more is recommended, with your footage on an SSD rather than a spinning drive.
- Save versions: duplicate the timeline before big changes ("Rough_v1", "Fine_v2") so you can always go back.
- Decide and move on: set a "good enough" standard for each pass. The rough cut doesn't need perfect timing, and the color pass doesn't need a cinematic grade.
- Reuse a project template: a saved project with your folders, tracks and export preset turns setup into one click.
Input
Your video as it is
Output
Let Revid make the first cut
If most of your raw footage is talking-head video for social media, you can skip the manual rough cut. Here is how it works with Revid:
- Upload your recording or paste a link into the auto edit video tool. It comes back edited, with your key lines turned into motion graphics.
- Add synced captions with the AI caption generator, which works in 100+ languages.
- Fix anything you don't like in the timeline editor, export in 720p, 1080p or 4K at 30 or 60 fps, and publish directly to TikTok, Instagram or YouTube.
Sign-up is free and new accounts get free credits to try video creation, no credit card needed; regular creation then uses the monthly credits of a paid plan, from $39/month. For cinematic or long-form projects where you control every shot, a manual editor is still the better fit; our comparison of AI video tools vs professional editors explains where each one wins.
FAQ
Can you edit raw video footage on your phone?
Yes, for everyday phone footage. iMovie on iPhone and CapCut both handle cutting, music and captions. Camera RAW files and long multi-camera shoots are easier on a computer, where editors like DaVinci Resolve can create proxies.
Is DaVinci Resolve good for beginners?
Yes, if you're willing to learn. The free version covers editing, color and audio at a professional level, and its Cut page is built for quick, simple edits. If you want the gentlest start on a Mac, begin with iMovie and switch later.
Why does my raw footage look gray and washed out?
Your camera most likely recorded in a log profile or a RAW format, which flattens the image to keep more highlight and shadow detail. Apply your camera maker's conversion LUT or your editor's color space transform, then correct as usual.
Should you color grade before or after editing?
After. Lock the cut first, then correct and grade, because every structural change after grading means redoing color on the clips you moved or replaced.
How do you edit raw video without losing quality?
Keep the original files untouched, edit at the resolution and frame rate you shot, and export once at the end as an H.264 MP4 at that resolution. Every extra export and re-upload compresses the video again.
Sources
- Revid analysis of 176,367 TikToks with 1,000+ likes posted between Oct 1, 2025 and Oct 16, 2026 (61,203 creators)
- Revid analysis of 176,367 TikToks analyzed by AI, with 1,000+ likes posted between Oct 1, 2025 and Oct 16, 2026 (61,203 creators)
- YouTube Official Blog, Tall updates coming to Shorts (October 2024)
Charts and figures checked on November 6, 2026.