Video Production Workflow: 3 Stages, Steps and Checklists (2026)
The three stages of a video production workflow, broken into concrete steps with deliverables, sign-off gates, software choices and export settings for every platform.
On this page
A video production workflow is the fixed sequence every video moves through: pre-production (brief, script, storyboard, logistics), production (filming or generating the footage) and post-production (editing, sound, color, captions, review and export). Each stage needs one owner, one deliverable and one sign-off before the next begins.
The expensive mistake is letting decisions drift downstream. Changing the message costs a sentence during scripting, a scene on the shoot day, and a full re-edit after the cut. A good workflow pulls every decision it can into pre-production and puts approval gates where changes are still cheap.
- Businesses that use video as a marketing tool
- 91%
- Wyzowl, December 2025
- Video marketers who have used AI video tools to create or edit videos
- 63%
- Wyzowl, December 2025
- Maximum length of a YouTube Short
- 3 min
- YouTube Official Blog, October 2024
The three stages of video production at a glance
Most teams treat publishing as the last step of post-production, but it helps to give it its own row so someone owns it.
| Stage | Steps | Deliverable | Who signs off |
|---|---|---|---|
| Pre-production | Creative brief, script, storyboard or shot list, casting, locations, schedule | Approved script and shot list | Client or project owner |
| Production | Set up, shoot or generate footage, record audio, log and back up files | Organized, backed-up raw footage | Director or producer |
| Post-production | Ingest, rough cut, fine cut, color, sound, captions, review, export | Final masters for each platform | Client or project owner |
| Delivery | Upload, schedule, publish, track results | Live posts and a results summary | Marketing lead |
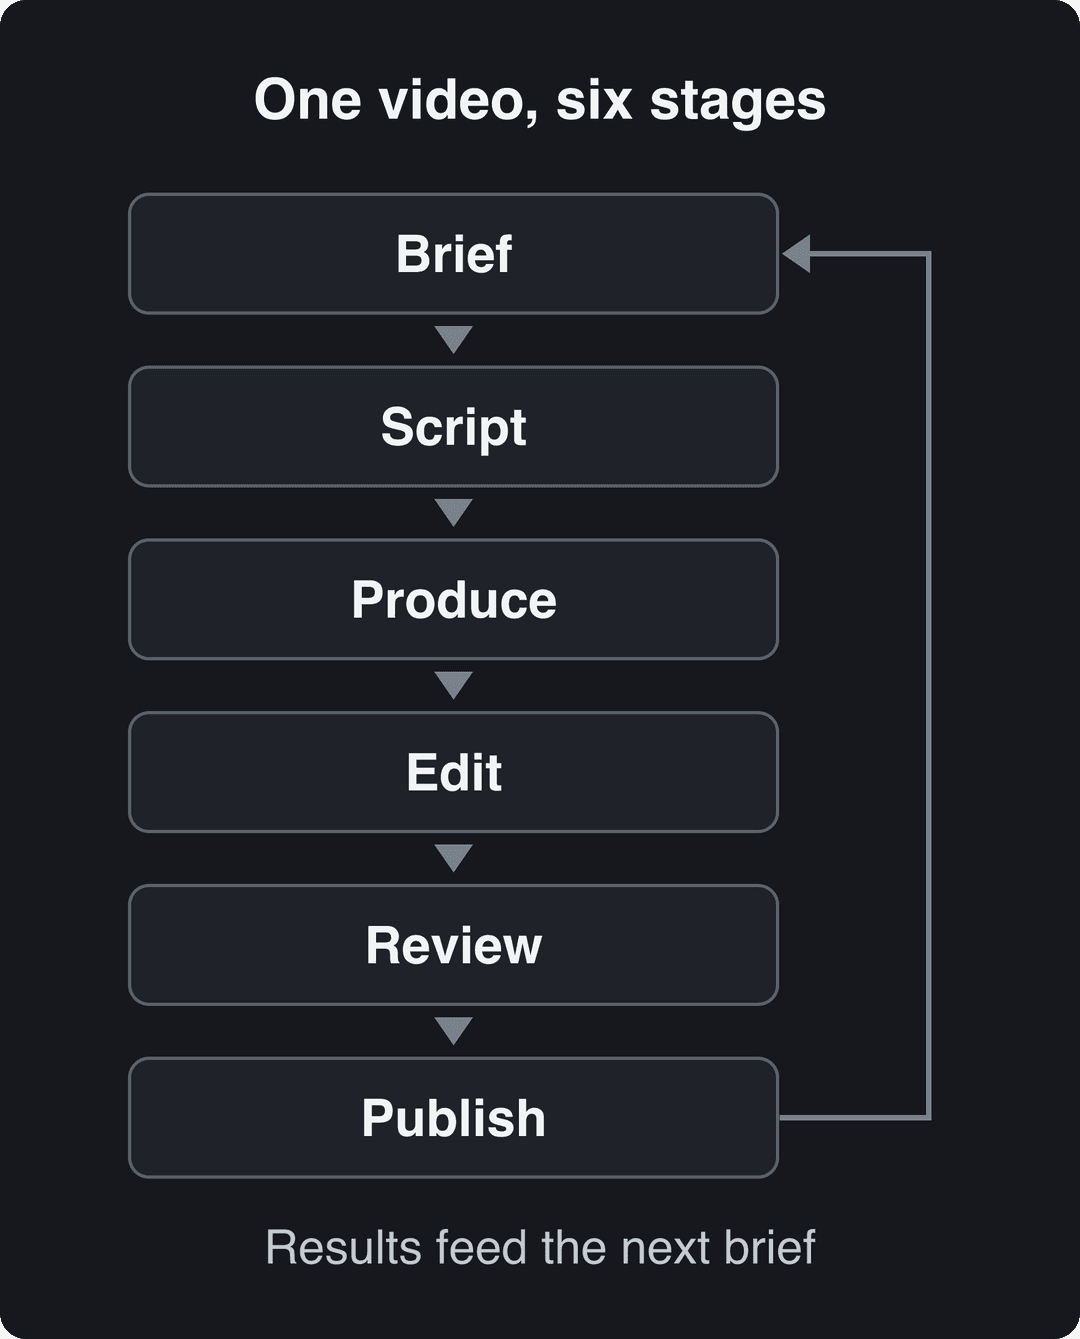
The loop at the end matters as much as the stages. What a published video teaches you (where viewers dropped, which hook held) should change the next brief, not sit in an analytics tab.
Pre-production: decide everything before the camera rolls
Pre-production is where you trade cheap decisions for expensive ones. Work through these steps in order and get each approved before moving on.
1. Write a creative brief
The brief is one page that everyone, including the client, agrees to. Copy this template:
- Goal: the single action a viewer should take (book a demo, buy, subscribe, remember one fact).
- Audience: who they are and what they already know.
- Key message: one sentence. If you need two, you need two videos.
- Deliverables: lengths, aspect ratios and platforms (for example, one 16:9 master for YouTube plus vertical cutdowns for TikTok and Reels).
- Tone and references: two or three existing videos that look and sound like the target.
- Budget and deadline: including the date for final approval, not only the publish date.
- Approver: one named person with the final say.
Prompt to try
Turn this approved script into a 45-second vertical video: "Most teams lose a week to revisions because the message changes after the cut. Here is the fix: lock one goal, one key message and one approver in the brief before anyone writes a line." Open on the hook as bold on-screen text, use clean stock footage of a team at work, a calm confident voice and synced captions.
2. Write the script
The script turns the key message into words and scenes. Open with the hook (the problem, the result or the surprising claim), give each scene one idea, and end on the action from the brief. Read it aloud with a timer: spoken length is the only reliable estimate of runtime. For structures and hook formulas, see our guide on writing video scripts.
3. Build a storyboard or shot list
A storyboard sketches each scene; a shot list states every shot with its framing, camera move, location and the script line it covers. For talking-head and interview shoots, a shot list is enough. For ads, animation and anything with complex staging, draw the storyboard so the client approves the visuals, not just the words.
4. Plan the logistics
Lock locations, talent, equipment, permits and the shoot schedule. Order the schedule by location and lighting setup, not by script order: shooting all scenes in one room back to back saves more time than any other on-set habit.
| Task | When | Common pitfall | How to avoid it |
|---|---|---|---|
| Define scope and goal | Project start | Vague objective, no single action | Force one goal and one approver in the brief |
| Creative brief | Early pre-production | No stakeholder input until the first cut | Get written sign-off on the brief |
| Script | Early pre-production | Weak hook, unclear message | Read aloud, cut every line that does not serve the goal |
| Storyboard or shot list | Mid pre-production | Shots that do not match the script | Map each shot to a script line |
| Location scouting | Mid pre-production | Noise, bad power, no light control | Visit at the same time of day as the shoot |
| Casting | Mid pre-production | Talent that cannot deliver the script | Run a short read of the actual lines |
| Equipment and crew | Late pre-production | Missing gear, budget overruns | Write a gear list per shot and test it the day before |
Production: capture footage the edit can use
Production executes the plan. The goal is not beautiful footage in general; it is the specific footage the shot list calls for, with clean audio, safely stored.
Pick equipment for the deliverable
Choose gear by what the final video needs. A documentary favors light, durable kit you can carry all day. A commercial may justify a cinema camera and a lighting crew. A social video for vertical feeds is often shot on a recent phone with a gimbal or tripod, a clip-on microphone and one soft light.
Get the sound right, then the light
Viewers forgive average picture far more readily than bad audio, and bad audio is the hardest thing to fix in post. Put a dedicated microphone close to the speaker, record a few seconds of room tone at each location, and monitor with headphones. For light, one large soft source beside the camera plus a fill or a reflector beats several small hard lights.
Shoot for the aspect ratio you will publish
Decide the frame before you shoot. TikTok's Creator Academy recommends 9:16 at 1080x1920 pixels, and Instagram Reels and YouTube Shorts are vertical-first too. If one shoot must feed both a 16:9 master and vertical cutdowns, frame wider and keep the subject centered so the vertical crop still works, or shoot the key shots twice. Wistia's video marketing statistics track how upload formats are changing if you need data for that decision.
Generating in the final shape matters: cropping a wide video to 9:16 cuts off text and faces. Avatar tools such as Synthesia and HeyGen default to 16:9 for training and web use.
Source: Revid data, Amplitude project_built by ratio for text-input tools, Sep 29 to Oct 28, 2026, 50,623 projects.
Show the data
| Share of projects | Projects | |
|---|---|---|
| 9:16 vertical | 83.2% | 42.1K |
| 16:9 wide | 15.2% | 7.7K |
| 1:1 square | 0.9% | 457 |
| 4:5 portrait | 0.7% | 356 |
Name and back up files on set
Use one naming pattern for every file, such as client_project_scene_take_date, and keep a camera log that matches it. Copy each card to two separate drives before you format it, and keep one copy off site or in the cloud. Footage that exists in only one place is footage you will eventually lose.
Post-production: turn footage into a finished video
Post-production follows a fixed order. Skipping ahead (color grading a scene that later gets cut) is the most common way editors waste days.
- Ingest and organize. Copy media into a project folder structure (footage, audio, music, graphics, exports), then tag clips by scene and take.
- Rough cut. Assemble the story in script order with the best takes. Ignore polish.
- Review the rough cut. Approve structure and story now, while changes are still cheap.
- Fine cut. Tighten pacing, cut on action, remove dead air and add B-roll.
- Color. Correct exposure and white balance first, then grade for mood and consistency across shots.
- Sound. Clean dialogue, mix music and sound effects, and balance levels.
- Captions and graphics. Add titles, lower thirds and captions. Most social video is watched with sound off at least some of the time, so captions belong in every vertical cut.
- Final review and export. Check spelling, logos, audio levels and legal lines, then export one master per format.
Which editing software fits your workflow?
| Software | Pricing model | Best for | Learning curve | Stands out for |
|---|---|---|---|---|
| Adobe Premiere Pro | Subscription | Agencies and teams already on Adobe apps | Moderate to steep | Integration with After Effects, Photoshop and Audition |
| DaVinci Resolve | Free version plus paid Studio version | Color grading and full editing on a budget | Steep | Node-based color tools, editing, audio and effects in one app |
| Final Cut Pro | One-time purchase | Solo editors on Mac | Moderate | Magnetic timeline, fast performance on Apple hardware |
| Avid Media Composer | Subscription or perpetual license | Film and TV productions | Steep | Shared projects for large editorial teams |
If your team mostly edits its own phone footage for social, a lighter editor like CapCut may be all you need; the full suites pay off when you deliver long-form masters or grade footage from several cameras.
How to run reviews without endless revisions
Review rounds are where schedules slip. Use a review platform where stakeholders leave comments pinned to a timecode, such as Frame.io, and keep briefs, scripts and approvals in shared docs, for example in Google Workspace. Then apply three rules:
- Name every export by version (v1, v2) and never overwrite a previous one.
- Collect one consolidated feedback list per round from the named approver, not separate emails from everyone.
- Agree on the number of review rounds in the brief, and get final approval in writing.
What settings should you export for each platform?
Export a separate master for each destination instead of letting platforms crop one file. To convert a finished video between 9:16, 4:5, 16:9 and 1:1, you can resize a video online without re-editing it.
| Destination | Aspect ratio | What to know |
|---|---|---|
| TikTok | 9:16, 1080x1920 recommended | Uploads can be up to 60 minutes long |
| YouTube Shorts | Vertical or square | Up to 3 minutes; a Short longer than one minute with an active Content ID claim is blocked |
| Instagram Reels | 9:16 recommended (1.91:1 to 9:16 accepted) | Reels longer than 3 minutes are not recommended to non-followers |
| YouTube (long-form) | 16:9 | Uploads are limited to 15 minutes until the account is verified |
| 1:2.4 to 2.4:1 | Videos up to 15 minutes | |
| Vimeo | Match your master | Common choice for client delivery, private review links and website embeds |
How to adapt the workflow to the type of video
Keep the same stages for every project and change how much weight each one gets.
| Video type | Pre-production emphasis | Production | Post-production | Review gates |
|---|---|---|---|---|
| Corporate and brand | Detailed script, storyboard, legal and brand review | Professional lighting and sound, controlled locations | Color, sound design, brand graphics | Strict sign-off at every stage |
| Ads and promos | Hook and call to action, several variants planned | Product shots, talent, multiple takes of the hook | Cutdowns per platform and per hook | Approve the concept and the final variants |
| Educational | Clear outline, visual aids planned per concept | Screen recordings, presenter, diagrams | Graphics, captions, chapter markers | Subject-expert check for accuracy |
| Social short-form | Topic, hook and script, often batched weekly | Phone, simple setup, or generated visuals | Fast cuts, captions, trending audio, vertical export | One quick approval, then learn from results |
Batch-ready prompt
Make a 30-second vertical TikTok on "3 coffee mistakes that make your home brew taste bitter". Hook in the first line: "Your coffee isn't bitter because of the beans." Use close-up stock footage of brewing, an upbeat voiceover, bold synced captions and a short end card asking viewers to follow for part 2.
A faster workflow for short-form social video
Short-form compresses the stages because the feedback comes from the audience within hours. A weekly loop works well:
- Research: collect videos in your niche that already perform and note their hooks and structure.
- Script in batches: write several scripts in one session, each with a hook in the opening line.
- Produce in batches: film or generate all of them in one block.
- Edit to a template: same caption style, same intro length, same end card.
- Publish on a schedule and note which videos held viewers.
- Feed results into next week's brief: make more of what worked, drop what did not.
For the planning side of this loop (calendars, idea banks, approvals across channels), see our guide to a content creation workflow.
How to run this workflow in Revid
Revid covers the short-form loop in one place, from research to publishing.
- Start in the AI video generator from an idea, a script or a link, or pick a reference from Revid's library of about 2.77 million short-form videos with their engagement data.
- Revid writes the script and builds scene-by-scene visuals (stock footage, AI images or AI video from models such as Seedance 2.5, MiniMax Hailuo, Wan 3.0 and Google Veo 3), with an AI voice-over in 70+ languages, synced captions and music.
- Fix any scene on the timeline editor and export in 720p, 1080p or 4K.
- Publish or schedule directly to TikTok, Instagram and YouTube with social media publishing, and check each post's views, likes and comments afterward.
Shares are of all 77,016 videos built in the period, including tools not shown.
Source: Revid product analytics (Amplitude), event project_built grouped by tool slug, September 29 to October 28, 2026, 77,016 builds
Show the data
| Videos built | Share of all videos (%) | |
|---|---|---|
| Prompt to video | 33.5K | 43.5% |
| Voice-over video from a script or link | 14.7K | 19.1% |
| Music video from a song | 12.4K | 16.1% |
| Audio to video | 4.3K | 5.6% |
| Article to video | 1.3K | 1.7% |
| Character swap | 1.2K | 1.6% |
| Captions on your own video | 999 | 1.3% |
| Clips from a long video | 973 | 1.3% |
| Talking avatar | 745 | 1% |
Where AI fits in a video production workflow
AI is most useful on the repetitive tasks between creative decisions. Hand these to software:
- Transcription and captions: an AI subtitle generator produces captions in 100+ languages in minutes instead of typing them by hand.
- First-pass editing: tools that auto edit talking videos remove pauses and add motion graphics for your key lines, giving the editor a rough cut to refine.
- Script drafts and variations: useful for hook variants and cutdowns, as long as a person checks facts and tone.
- Visuals you cannot shoot: AI video and images for concepts, B-roll or scenes that would need a location or a crew.
Keep people on the brief, the message, the approvals and the final quality check. Vendor case studies, such as those collected in SundaySky's video marketing statistics, describe cost savings from AI production; measure your own time per video before and after to know what you actually gain.
Two platform rules belong in your checklist. YouTube requires you to disclose realistic AI-generated or altered content in YouTube Studio, and TikTok requires a label on AI-generated content with realistic images, audio or video; both say the label alone does not reduce distribution. For monetized YouTube channels, AI-assisted videos are allowed when they show your creative vision, but mass-produced videos made from generic templates are not allowed to monetize.
How to scale video production without losing quality
Video is now standard for most businesses: in Wyzowl's 2026 survey, 91% of businesses said they use video as a marketing tool (more figures on our short-form video statistics page and in Vidico's video marketing statistics roundup). Producing more of it without the quality dropping comes down to five habits.
Give every stage an owner
A solo creator or a small team can share everything. As volume grows, split the roles: a producer or project manager owns the schedule and approvals, a lead editor owns post-production and the house style, and a content strategist owns briefs and results. One owner per stage removes the question of who decides.
Write the workflow down
Document each stage as a short checklist: folder structure, naming pattern, export presets, caption style, review rules. A new editor should be able to deliver a video that matches the house style by following the document alone.
Template what repeats
Save project templates with your title cards, lower thirds, caption styles, color presets and export settings. Standardize the technical layer and leave the creative layer (story, visuals, pacing) open.
Check quality at fixed points
Use the same quality checklist before every export: spelling and names, logo and brand colors, audio levels, captions synced, correct aspect ratio, call to action present, AI disclosure set where it applies.
Automate the recurring formats
For series and recurring social formats, automation removes the manual steps entirely. Revid's Auto-Mode workers can automate video creation by producing a fresh video every day from a prompt or a content source, which you can review before it goes out.
FAQ
How long does a video production workflow take?
It depends on scope. A short social video made from a script and phone footage or generated visuals can go from idea to post in a day, while a commercial with a shoot, talent and several review rounds usually takes weeks, with pre-production taking the largest share.
What is the difference between pre-production and post-production?
Pre-production is all the planning before filming: brief, script, storyboard, casting, locations and schedule. Post-production is everything after filming: editing, color, sound, captions, review and export.
What software do you need for a video production workflow?
At minimum, an editor (Premiere Pro, DaVinci Resolve, Final Cut Pro or a lighter tool for social), shared documents for briefs and scripts, and a review tool with timecoded comments. Add cloud storage for backups and a scheduler or publishing tool if you post to social platforms.
How do you speed up video production?
Get the script approved before production, batch scripting and filming, edit from saved templates, and limit review rounds in the brief. For recurring short-form formats, AI tools that generate, caption and publish videos remove most of the manual steps.
Sources
- Revid data, Amplitude project_built by ratio for text-input tools, Sep 29 to Oct 28, 2026, 50,623 projects.
- Revid product analytics (Amplitude), event project_built grouped by tool slug, September 29 to October 28, 2026, 77,016 builds
- Wyzowl, Video Marketing Statistics 2026 (December 2025)
- Wyzowl, Video Marketing Statistics 2026 (December 2025)
- YouTube Official Blog, Tall updates coming to Shorts (October 2024)
Charts and figures checked on November 6, 2026.