YouTube Video Workflow: 6 Editing Steps That Hold Viewers
The six-stage YouTube editing workflow that fixes structure before effects, plus how to re-edit a published video from its retention graph and where AI saves time.
On this page
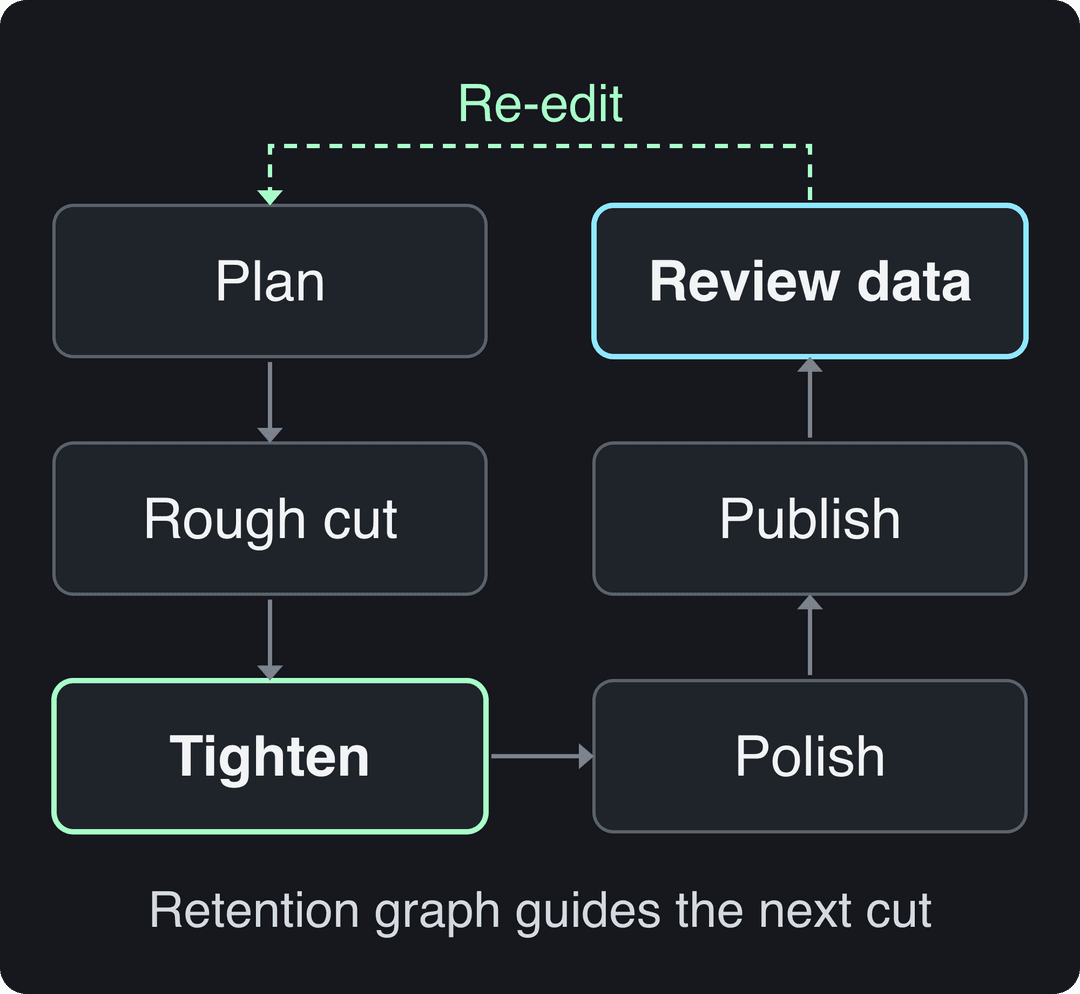
A solid YouTube video workflow has six stages: plan the structure, rough cut, tighten for retention, polish (audio, captions, graphics), export and publish, then read Audience Retention in YouTube Studio and re-edit. The order matters: fix structure and pacing before you spend a minute on effects.
Most creators run it backwards. They polish first and check analytics last, if ever. In AIR Media-Tech's analysis of retention editing patterns across 100 long-form channels, the top 25% by average view duration kept viewers 20 to 30% longer than the rest, and the levers it points to are editing decisions: a faster opening and regular changes in what the viewer sees, not more transitions.
- How much longer the top 25% of channels by view duration kept viewers
- 20-30%
- AIR Media-Tech, 100 long-form channels
- Video uploaded to YouTube every minute, as of 2017
- 400+ hours
- Tasty Edits 2023 creator study
- Interval for a pattern change that helps reset viewer attention
- 10-20 s
- AIR Media-Tech retention analysis
- Maximum length of a YouTube Short (square or vertical video)
- 3 minutes
- YouTube Official Blog, October 2024
The YouTube video workflow at a glance
| Stage | What you do | Output |
|---|---|---|
| 1. Plan | Write the promise, the outline and the opening line | A one-page edit plan |
| 2. Rough cut | Assemble the best takes in story order | A watchable but long draft |
| 3. Tighten | Cut repetition, move proof earlier, add pattern changes | A draft that gets to the point |
| 4. Polish | Audio levels, captions, graphics, music, color | A finished master |
| 5. Publish | Export, title, thumbnail, description, chapters | A live video |
| 6. Review and re-edit | Read the retention graph, fix the cause, apply it to the next video | Notes for the next edit |
The volume of competition is why this order matters. More than 400 hours of video were already being uploaded to YouTube every minute by 2017, a figure repeated in the Tasty Edits 2023 creator study report. A clean timeline is not enough to compete for that attention; a clear one is.
Step 1: Plan the edit before you record
Editing gets slow when the structure is decided in the timeline. Write three things before you film:
- The promise: what the viewer gets, in one sentence that matches the title.
- The outline: opening, 3 to 5 sections, payoff. Each section should prove or develop the promise.
- The first line: the sentence that states the result or the conflict. No greeting, no logo sting.
If you edit for someone else, put this plan in a shared doc with timestamps for the takes you want. It removes most back-and-forth revisions. For the full editing basics (software setup, cuts, transitions), see our guide to editing YouTube videos.
Step 2: Rough cut in story order
Import, label and sort clips into bins (A-roll, B-roll, screen recordings, music). Then lay the best take of each section on the timeline in outline order and stop. Don't color, don't add music, don't animate captions yet.
The rough cut answers one question: does the story work? Watch it once at normal speed. If a section is confusing in the rough cut, no effect will save it later.
Repetitive commands are where hours disappear at this stage. Keyboard shortcuts help, and some editors also use voice commands; these tips on editing by voice on desktop cover that setup. Survey data collected in CapCut's roundup of YouTube video statistics ranks editing as the most time-consuming part of production for creators, so shaving minutes here compounds.
Step 3: Tighten for retention
This is the stage most workflows skip, and it does the most for watch time.
- Deliver the promise in the first 30 seconds. AIR Media-Tech recommends making the title's payoff clear within that window. Cut intros, recaps and setup the viewer doesn't need yet.
- Cut repetition. If the speaker makes the same point twice, keep the clearer version.
- Move proof earlier. A result, demo or example shown early buys patience for the explanation.
- Change something every 10 to 20 seconds. AIR's analysis found a pattern change in that range helps reset attention. Use a new shot size, a screen insert, an example, a caption that adds information, or a question. Loud whooshes are optional.
- Keep meaningful pauses. A beat after a key line or before a reveal is pacing, not dead air.
A cut earns its place when it improves clarity, pace, emotion or proof. If it only makes the timeline look busier, delete it.
Step 4: Polish audio, captions and graphics
Polish in this order, because each layer depends on the one before:
- Audio first. Even out dialogue levels, remove hum and clicks, then duck music under speech. Viewers forgive soft footage faster than bad sound.
- Captions second. Auto-generate them, then correct names, technical terms and emphasis by hand.
- Graphics and text third. Add on-screen text only where it adds information the speech doesn't.
- Color last. Match shots so cuts don't jump in tone.
Step 5: Export and publish
Export at your source resolution and frame rate, and watch the exported file full screen before uploading. For aspect ratios and sizes on every platform, use our social media video sizes cheat sheet.
Upload limits worth knowing: YouTube uploads are capped at 15 minutes by default until your account is verified, and the maximum file is 256 GB or 12 hours, whichever is less. Titles can be up to 100 characters and descriptions up to 5,000.
For custom thumbnails, YouTube now recommends 3840x2160 (16:9, minimum width 640 px), with files up to 50 MB on desktop but only 2 MB on mobile; custom thumbnails need a verified account. On desktop, YouTube Studio's Test & Compare can A/B test up to 3 titles and thumbnails and keeps the one with the highest watch time (Shorts aren't eligible).
Step 6: Read retention, then re-edit
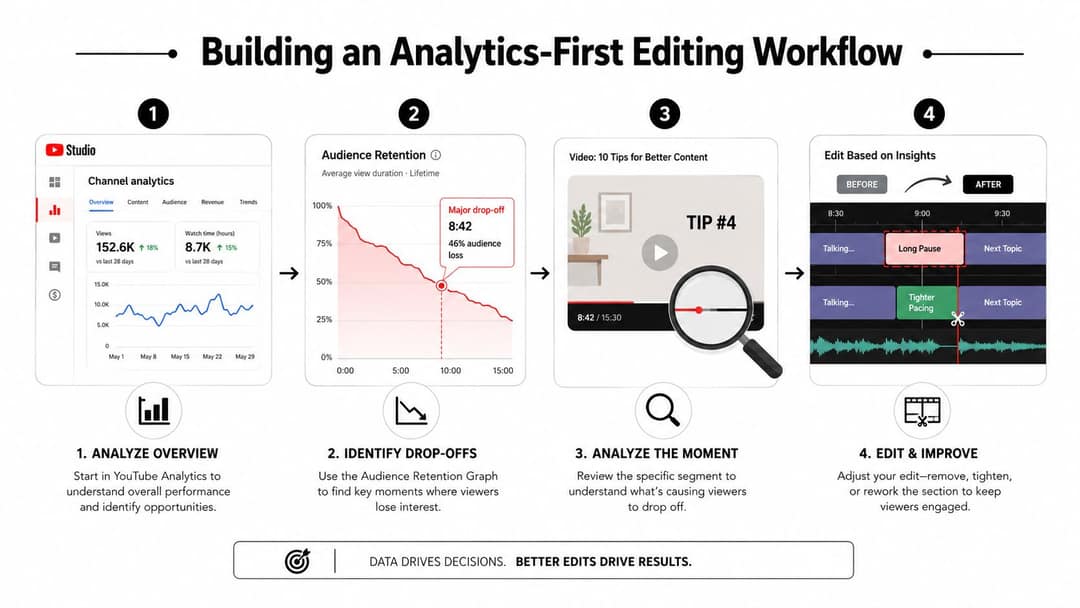
Open the video in YouTube Studio, go to Analytics, and look at the Audience Retention graph. Diagnose before touching the timeline:
- Find the first sharp drop. Note the timestamp and what is on screen: the sentence, shot or transition.
- Watch 20 to 30 seconds around it. Look for a delayed answer, repeated setup, a confusing visual, an audio change or a promise that wasn't kept.
- Fix the cause, not the symptom. Remove filler, move proof earlier, shorten the explanation or swap the visual.
- Review the opening separately. An unclear first 30 seconds costs more viewers than a slow patch halfway through.
Two cautions when you judge an edit. First, since August 24, 2026, YouTube counts a view the moment a video starts to play, on Shorts, long-form and live, so raw views say less about whether your edit worked. Judge it by the retention curve and average view duration (YouTube Partner Program earnings still use engaged views). Second, normalize targets to length: mid-length videos are often discussed around 40 to 50% average view duration, but AIR stresses that short videos can beat that and long ones often sit lower.
How to re-edit a published YouTube video
You have two options, and they behave very differently.
Edit in YouTube Studio. Open Content, pick the video and choose Editor. You can trim or cut out sections, blur parts of the frame, add audio from the library and set end screens. The video keeps its URL, views and comments, though changes can take a while to process. This is the right fix when retention shows a slow intro or a dead section you can simply remove.
Re-cut and re-upload. Anything beyond trimming (reordering sections, new B-roll, new captions burned in, a new opening) means editing your project file and uploading a new video. YouTube doesn't let you swap the file of a published video.
Choosing editing tools for your workflow
The right editor is the one that makes the tasks you repeat every week fast. Pick by workflow, not feature count.
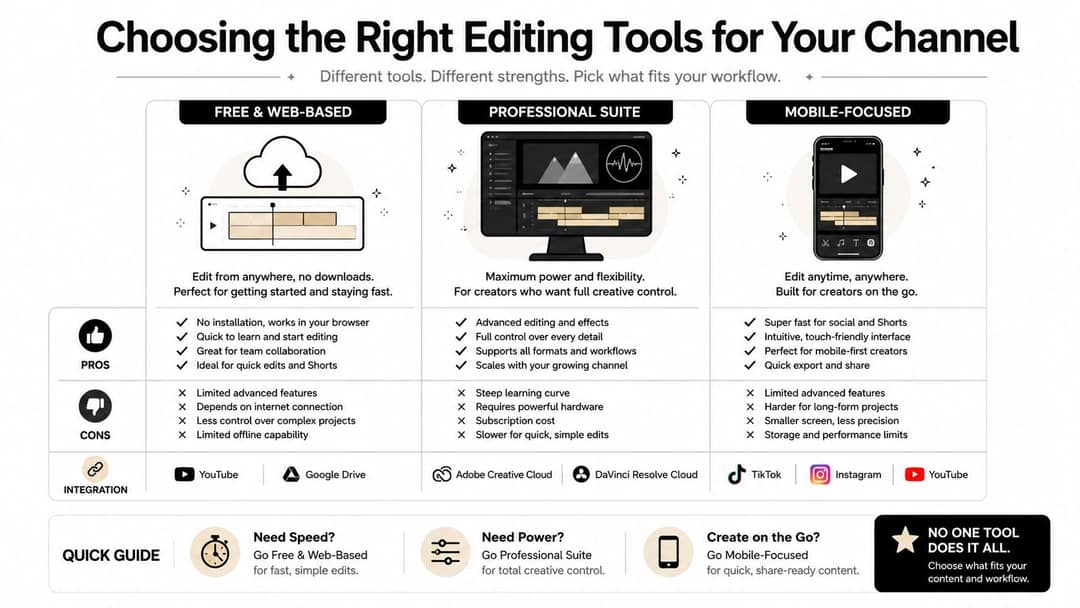
| Tool | Best for | Fits which stage |
|---|---|---|
| CapCut | Fast edits of your own footage on mobile or desktop, auto-captions, trend templates | Rough cut to polish for short and mid-length videos |
| Descript | Editing talking videos and podcasts by editing the transcript, filler-word removal | Rough cut and tighten for spoken content |
| Adobe Premiere Pro | Detailed long-form editing with layered timelines | Every stage, for editors who want full control |
| DaVinci Resolve | Editing, color and audio in one application | Polish, especially color and sound |
| Revid | Turning long videos into vertical clips, auto-editing talking footage, or generating new short videos from a script, prompt or link, then publishing | Clips, captions and publishing |
Before committing, test the jobs that eat your week: removing pauses without flattening the speaker, correcting captions quickly, keeping the subject visible when reframing to vertical, and repairing uneven audio. For more picks by skill level, see our list of video editing software for beginners, and this outside roundup of tools for YouTubers covers the wider stack beyond editing.
AI video editing workflow tips
AI is good at tasks with a clear pattern and bad at judgment. Split the work that way:
- Automate discovery: silence detection, transcripts, topic changes and candidate clip moments.
- Automate the first caption pass, then correct it yourself.
- Supervise structure: you decide whether the opening delivers the title's promise and whether proof arrives soon enough.
- Protect the voice: restore intentional pauses and reject cuts that make the speaker sound unnatural.
- Finish manually: check names, claims, visual continuity, music levels and the final rhythm.
Watch the pacing AI applies. Shorts-style jump cuts can add energy to a dense explanation, but the same rhythm across a calm tutorial makes it feel breathless.
Know the policy lines too. YouTube allows AI and automated tools in monetized videos when the result shows your creative vision and gives real value, such as AI-assisted script edits or a background visual. Since July 15, 2025, its "inauthentic content" policy covers repetitive or mass-produced videos, including AI content built from generic templates without original insight. Disclosure is required for realistic AI-generated or altered content (the "AI use" setting in YouTube Studio), but not for AI-written scripts, captions or cloning your own voice for a voice-over. Since May 2026, YouTube also labels undisclosed videos with significant photorealistic AI automatically.
Input
Your video as it is
Output
The index leans toward videos that surface in hashtag and keyword searches, so its view counts run high: compare the groups, not the absolute numbers.
Source: Revid TikTok index: 2,377,477 TikToks with AI labels per video, snapshot of Sep 15, 2026. Median views estimated from view buckets.
Show the data
| Median views | Share past 1M views | |
|---|---|---|
| 0-7s | 88.3K | 19.9% |
| 8-15s | 111.1K | 22.6% |
| 16-30s | 141K | 25.1% |
| 31-60s | 120.4K | 22.8% |
| 61-120s | 97K | 19.8% |
| 2-5 min | 89.1K | 18.3% |
| 5 min+ | 90.1K | 17.2% |
How to do the clip and caption steps with Revid
If your workflow ends with Shorts, Reels or TikToks cut from a long video, Revid covers those steps in one place:
- Paste the video link into the YouTube Clip Maker: the AI turns the long video into short vertical clips.
- For a raw talking recording, Auto Edit Video returns it edited, with your key lines turned into motion graphics.
- Correct captions with the AI caption generator (100+ languages), adjust scenes in the timeline editor, and export in 720p, 1080p or 4K at 30 or 60 fps.
- Publish or schedule to YouTube, TikTok and Instagram from the same queue.
Two Shorts rules apply to clips: vertical or square videos up to 3 minutes count as Shorts, and any Short longer than one minute with an active Content ID claim is blocked worldwide. Keep text inside the YouTube Shorts safe zone. For a system that turns every long video into a batch of clips, see our content repurposing workflow.
When less editing performs better
The most common mistake is adding an effect whenever a section feels slow. A zoom hides a weak sentence, a whoosh hides a late transition, and the viewer still doesn't know why the moment matters. YouTube's Help Center guidance on editing frames edits around your audience and story rather than a fixed visual formula.
Pick an editing intensity on purpose:
- Minimal: for expertise, calm explanation or personal connection. Clean cuts, readable graphics, natural room tone.
- Cinematic: when atmosphere carries the story. Composition, sound design and motivated camera movement do the work.
- Highly stylized: for commentary, gaming, comedy or dense demos where the audience expects constant visual change. Even here, an effect should mark a new idea.
This tutorial shows a restrained, minimal style built in CapCut:
Two quick tests: remove an effect and see if the beat works better without it. Then watch the edit muted (if the structure gets confusing, the visuals carry too little meaning) and listen without watching (if the pacing feels exhausting, cuts are covering weak sequencing).
Pre-publish checklist
- The title's promise is clear within the first 30 seconds.
- No logo animation, long greeting or recap delays the first useful moment.
- Every repeated point is cut to one version.
- Something changes on screen every 10 to 20 seconds, and each change means something.
- Dialogue levels are even and music sits under speech.
- Captions are corrected for names and terms.
- The exported file was watched full screen.
- Title, thumbnail, description and chapters are set; any realistic AI is disclosed.
- A reminder is set to check the retention graph once the video has had time to collect views.
FAQ
What is a good YouTube editing workflow for beginners?
Plan, rough cut, tighten, polish, publish, review. Start with a one-page outline and a free editor such as CapCut or DaVinci Resolve, and don't add music or effects until the rough cut tells the story clearly.
Do you lose views if you re-upload an edited YouTube video?
Yes. A re-upload is a new video with a new URL, zero views and no comments. Trimming or cutting sections in YouTube Studio's Editor keeps the original's views and comments.
Should Shorts and long-form videos use the same editing workflow?
The stages are the same, but Shorts compress them: the promise lands in the first seconds, and the clip must stay readable in a vertical frame. Many creators edit the long video first, then cut Shorts from it as a separate pass.
Do I need to disclose AI editing on YouTube?
Only for realistic AI-generated or altered content, such as a real person appearing to say something they didn't. AI-written scripts, auto captions, minor edits and cloning your own voice don't require disclosure, and disclosing doesn't by itself limit reach or monetization.
How do I know which part of my video to re-edit?
Start at the first sharp drop in the Audience Retention graph in YouTube Studio. Watch the moment in context, identify the cause (a delayed answer, repetition, a confusing visual) and fix that before anything later in the video.
Sources
- Revid TikTok index: 2,377,477 TikToks with AI labels per video, snapshot of Sep 15, 2026. Median views estimated from view buckets.
- YouTube Official Blog, Tall updates coming to Shorts (October 2024)
Charts and figures checked on November 6, 2026.